
The first time we run kubectl apply -f app.yaml with a Deployment inside, we suddenly see a Pod, a ReplicaSet, and a Deployment all show up in our cluster; even though the file only defined one thing. Then the confusion starts: which one is actually running our container?
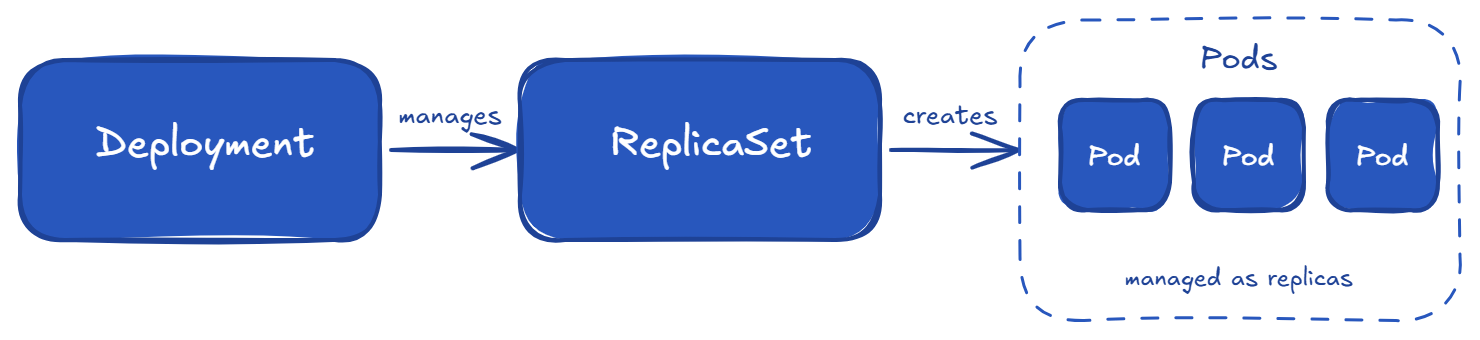
This happens because Kubernetes works in layers. The Deployment creates a ReplicaSet, and the ReplicaSet creates the Pods. So from one YAML file, multiple objects are created automatically. This is why it feels confusing in the beginning, even for experienced users.
In this article, we will understand what each object does, when to use it, and how they work together to run our application.
A Kubernetes object is a saved record in our cluster that describes both what we want and what is actually running. We tell Kubernetes our goal (like "run a web app," "store a secret," or "set a network rule"), and Kubernetes makes sure it happens and keeps it that way.
Every object looks like this:
apiVersion: apps/v1
kind: Deployment
metadata:
  name: my-app
  namespace: production
spec:
  replicas: 3
status:
  availableReplicas: 3
There are two important fields here:
Kubernetes constantly checks if our desired state (spec) matches the real state (status). If something is wrong, it fixes it automatically. For example, if a Pod crashes, Kubernetes creates a new one. If there are too many Pods, it removes extras. This continuous checking and fixing is how Kubernetes works internally.
One small note: user often use the words "object" and "resource" in the same way. Technically, a resource is the API resource type, served at an HTTP endpoint; core resources like Pods live under /api/v1/... and grouped resources like Deployments live under /apis/apps/v1/.... An object is what we create: a persistent instance of that resource, stored in the cluster. User generally mix these terms all the time, and that’s completely okay.
Before going deeper, here are the main Kubernetes objects that we will cover:
A Pod is the smallest unit in Kubernetes. It runs one or more containers together. All containers in a Pod share the same network (same IP address) and storage (volumes). They can talk to each other using localhost, and they always run on the same node.
Here is a simple Pod:
apiVersion: v1
kind: Pod
metadata:
 name: nginx
spec:
 containers:
 - name: web
   image: nginx:1.27
   ports:
   - containerPort: 80
That’s it. We will run kubectl apply -f pod.yaml, and it will start.
Here is the important part: we never create Pods directly in production. Pods can die easily. If a node goes down, the Pod is gone and Kubernetes will not bring it back. There is no self-healing, no scaling, and no updates.
Prod applications run using a controller like a Deployment, which manages Pods for us. It handles restarts, scaling, and updates. Most users only see Pods when checking logs or debugging.
For a deeper understanding, including lifecycle, probes, and resource limits, see our article on Kubernetes Pods.
A ReplicaSet has one simple job: keep a fixed number of Pods running all the time. If a Pod dies, it creates a new one. If we increase the number, it creates more Pods. If we reduce it, it deletes the extra ones.
Here is a simple ReplicaSet:
apiVersion: apps/v1
kind: ReplicaSet
metadata:
  name: web-rs
spec:
  replicas: 3
  selector:
    matchLabels:
      app: web
  template:
    metadata:
      labels:
        app: web
    spec:
      containers:
      - name: nginx
        image: nginx:1.27
The ReplicaSet finds which Pods to manage using the selector field. It matches labels on the Pods. This label-based matching is a common pattern in Kubernetes.
Just like Pods, we usually don’t create ReplicaSets directly in production. Instead, a Deployment creates and manages them for us. When we update a Deployment, it creates a new ReplicaSet in the background and slowly replaces the old Pods with new ones(this is the default rolling update behavior).
If we run kubectl get rs, we will usually see ReplicaSets created by Deployments. They have a random hash added to their name.
We use Deployments, not ReplicaSets. The only time we might use a ReplicaSet directly is when we need very custom behavior, which is rare.For more details, read the official ReplicaSet docs.
A Deployment is what we will use most of the time. It sits on top of ReplicaSets and gives us easy updates, rolling deployments, version history, and rollbacks. The relationship looks like this:
A Deployment YAML looks very similar to a ReplicaSet, with a few extra fields like strategy:
apiVersion: apps/v1
kind: Deployment
metadata:
  name: web
spec:
  replicas: 3
  strategy:
    type: RollingUpdate
    rollingUpdate:
      maxSurge: 1
      maxUnavailable: 0
  selector:
    matchLabels:
      app: web
  template:
    metadata:
      labels:
        app: web
    spec:
      containers:
      - name: nginx
        image: nginx:1.27
There are two important update strategies:
Two important settings:
Setting maxUnavailable: 0 is a safe choice for user-facing apps.
The following Common commands we will use daily:
# check rollout status
kubectl rollout status deployment/web

# see rollout history
kubectl rollout history deployment/web

# roll back to previous version
kubectl rollout undo deployment/web

# scale without editing YAML
kubectl scale deployment/web --replicas=5
The rollback command is very useful. If a bad image goes to production, we can quickly go back to the previous version with one command.
One important thing to remember: A Deployment creates a new rollout only when the Pod template changes. If we only change things like:
then a new ReplicaSet will not be created. This scenario often confuses users.
We can go deeper with the official Deployments docs.
Deployments cover most stateless apps, but there are a few other important workload controllers we should know:
a. StatefulSet is used for stateful applications where each Pod needs a fixed identity and its own storage. Each Pod gets a predictable name like db-0, db-1, and keeps the same name and storage even after restart. This is used for databases (Postgres, MySQL), message systems (Kafka, RabbitMQ), and search engines (Elasticsearch). By default, Pods are also started and updated in order, which is important when one depends on another.
b. DaemonSet runs one Pod on every node (or selected nodes). It is used for system-level agents like log collectors (Fluent Bit), monitoring agents (Prometheus node exporter), networking plugins, and security tools. When a new node is added to our cluster, a Pod is automatically created on it.
c. Job runs a Pod until it completes successfully, then stops. It is used for one-time tasks like database migrations, batch jobs, or data processing. It can retry if the task fails. A newer concept called JobSet helps manage multiple related Jobs, useful for things like ML workloads.
d. CronJob is a Job that runs on a schedule, similar to Linux cron (for example, 0 2 * * * means every day at 2 AM). It is used for scheduled tasks like backups, cleanup, and reports. We need to be careful with time zones and overlapping runs.
A simple way to choose the right Controller:
Pods are temporary. Their IP addresses can change when they restart or move to another node. If our frontend directly uses a Pod IP, it will break when that Pod changes. A Service solves this problem by giving a stable IP and DNS name that always points to the correct Pods.
How does a Service know which Pods to send traffic to? It uses labels and selectors, just like ReplicaSets.
apiVersion: v1
kind: Service
metadata:
  name: web
spec:
  selector:
    app: web    # matches Pods with this label
  ports:
  - port: 80
    targetPort: 8080
  type: ClusterIP
There are three common Service types:
For routing HTTP/HTTPS traffic based on paths or domains, we need Ingress or the newer Gateway API.
Important update: Ingress-NGINX is being retired around March 2026, and the Kubernetes community is moving toward Gateway API. It is more flexible and better designed, especially for large teams.
If we are starting fresh in 2026, it is better to use the Gateway API.
A Namespace is used to divide a single Kubernetes cluster into smaller logical groups. This allows multiple teams or applications to share the same cluster without conflicts. Resources in different namespaces can have the same name.
Every cluster has four default namespaces:
We should create our own namespaces based on:
A common pattern is team-name-env (example: payments-prod, payments-staging)
This keeps things simple and easy to manage.
Namespaces are also used for:
One important thing: Namespaces are not a security boundary by default. Pods in one namespace can still talk to Pods in another namespace. If we want proper isolation, we must use NetworkPolicies.
So think of namespaces as:
Read the official Namespaces docs for more details.
Almost everything in Kubernetes depends on labels. A Deployment finds its Pods using labels. A Service routes traffic using labels. NetworkPolicies also use labels to select Pods. Labels are what connect different Kubernetes objects together.
A label is a simple key/value pair added to an object:
metadata:
  labels:
    app: web
    tier: frontend
    environment: production
A selector is used to find objects based on labels. For example, a Service uses a selector to choose which Pods to send traffic to:
spec:
  selector:
    app: web
    tier: frontend
This matches any Pod that has both labels (selectors use AND logic). We can add more labels to make the selection more specific.
The Selectors have two types:
Most Kubernetes components internally use set-based selectors because they are more flexible.
Kubernetes also recommends using standard labels that start with app.kubernetes.io/, such as:
These standard labels help tools like Helm, Kustomize, and monitoring systems understand our resources better.
One important thing: We have to decide our labelling strategy early and keep it consistent. Labels are easy to add at the beginning but hard to change later, because the selector on controllers like Deployment and StatefulSet is immutable after creation; if we need to change it, we have to delete and recreate the object.
Here is a commonly used labelling pattern:
labels:
  app.kubernetes.io/name: web
  app.kubernetes.io/instance: web-prod
  app.kubernetes.io/version: "2.4.1"
  app.kubernetes.io/component: frontend
  app.kubernetes.io/part-of: payments
  team: payments
  environment: production
For more, see the official Labels and Selectors docs.
There are three more objects that help us to run prod applications in Kubernetes: ConfigMap, Secret, and PersistentVolume (PV) / PersistentVolumeClaim (PVC).
a. ConfigMap is used to store non-sensitive configuration like environment variables, config files, or command-line flags. We can use it inside a Pod like this:
envFrom:
- configMapRef:
    name: app-config
We can also mount it as a file using a volume.
One important thing: updating a ConfigMap does not automatically restart Pods. If our app reads config only at startup, we must manually restart the Deployment using kubectl rollout restart deployment/web. Some tools, like Reloader or Helm, use checksum patterns to help automate this.
b. Secret is used for sensitive data like API keys, database passwords, and TLS certificates. It works almost the same way as ConfigMap.
One important thing: Secrets are only base64-encoded, not encrypted. By default, they are stored in etcd in readable form. Anyone with permission to read secrets can see the actual values. So Secrets are not fully secure on their own.
For better security in production, combine Secrets with:
c. PersistentVolume (PV) and PersistentVolumeClaim (PVC) are used for storage:
Kubernetes connects a PVC to a matching PV, and our Pod uses the PVC.
In prod setups, we usually use a StorageClass for dynamic provisioning. This means when we create a PVC, Kubernetes automatically creates the required PV for us. Our main job is to define the PVC and choose the correct StorageClass based on performance needs.
Here’s what happens when we deploy a application in Kubernetes. Suppose we want to run a web app with a database and expose it to users.
postgres.shop-prod.svc.cluster.local, and another ClusterIP Service for the web app.This is what a prod setup looks like using basic Kubernetes objects. No advanced tools, just core building blocks working together.
Note: All these objects run on Nodes, which are the actual machines (physical or virtual) in the cluster. Each machine is represented inside Kubernetes as a Node object. We usually don't interact with these Node objects directly. They are managed by Kubernetes.

Here are some simple habits that make a big difference in production:
Kubernetes may look complex at first, but it becomes easier once we understand the core building blocks and how they connect.
Most of our work will revolve around a few key patterns: defining desired state, letting controllers manage workloads, and using Services and labels to connect everything together.
Once these basics are clear, we can confidently build and run prod applications on Kubernetes without any confusion.
What is the difference between a Pod and a Deployment?
A Pod is the actual running unit (one or more containers). A Deployment is a controller that manages Pods, handling scaling, updates, and rollbacks. We define a Deployment, and Kubernetes creates and maintains the Pods.
What are the main Kubernetes objects?
The main objects are: Pod, ReplicaSet, Deployment, StatefulSet, DaemonSet, Job, CronJob, Service, Ingress (or Gateway API) , ConfigMap, Secret, PersistentVolume, PersistentVolumeClaim, Namespace, and Node. Controllers manage Pods, Services expose them, and storage/config objects support the application.
Is a Service a Kubernetes object?
Yes. A Service is a Kubernetes object with its own API. It provides a stable IP address and DNS name for a group of Pods.
What is the difference between Kubernetes objects and resources?
In daily use, both terms are used the same way. Technically, a resource is the API endpoint (like /api/v1/pods for Pods, or /apis/apps/v1/deployments for Deployments) , and an object is the instance we create. Most user use them interchangeably.