
If you work with Kubernetes, you work with Kubernetes Pod. Every Deployment, StatefulSet, DaemonSet, and Job you have ever created is just a way to manage Pods under the hood.
Most engineers never go deeper than “kubectl get pods”. When things break in production such that Pods are stuck in Pending, containers are getting OOMKilled, or unexpected CrashLoopBackOff loops occur, a basic understanding is not enough.
Whether you are just getting started with Kubernetes or you have been running production clusters for years, this guide has something for you.
Let's get into it.
Let's quickly revisit container before we talk about Kubernetes Pod. A container is a lightweight, isolated environment where we package our application along with its dependencies. It runs a single process (a process is simply a running instance of a program, like a Python script executing in memory), gets its own filesystem, and can have CPU and memory limits applied to it. Tools like containerd and CRI-O are responsible for running these containers on a Linux host using namespaces and cgroups under the hood.
Kubernetes does not run containers directly. Instead, it wraps them inside a higher-level abstraction called a Pod.
A Pod is the smallest deployable unit in Kubernetes. It represents a single instance of a running application; it can contain one or more tightly coupled containers that Kubernetes manages as a single unit. When we want to run an Nginx web server, a Java API, or a Python worker; we do not just create a container. We create a Pod, and the container runs inside it.
We can think of it as; a container is the actual application process, and a Pod is the environment that hosts it. That environment includes shared networking, shared storage, and a common set of specifications that Kubernetes uses to schedule, manage, and monitor our workload.
This is one of those questions that came up early when I started learning Kubernetes.
Let's answer it.
As we know, a container is just a process that is packaged and running in an isolated environment. That works fine on a single machine with Docker; we build an image, run it, map some ports, and we are done.
But an orchestration system that runs thousands of containers on hundreds of nodes needs more information, like:
A raw container cannot answer any of this. Kubernetes needed a higher-level object to act as the basic unit of scheduling, networking, and lifecycle management. That object is the Pod.
The Kubernetes team made an intentional decision early on that Kubernetes should not be tied to any specific container runtime. Docker was the most popular option at the time, but locking the orchestration layer to one runtime would have been a mistake.
The Pod abstraction sits between Kubernetes and the container runtime. Kubernetes manages Pods. The runtime such as containerd, CRI-O, or anything implementing the Container Runtime Interface; handles the actual work of pulling images, creating namespaces, and starting processes.
This is exactly why Kubernetes removed dockershim in version 1.24 without breaking a single workload. The Pods stayed the same, and only the runtime underneath changed. That is the power of the abstraction.
The Kubernetes scheduler needs a single object to evaluate when placing workloads on nodes. That object is the Pod.
When we define resource requests and limits in our Pod spec, we are setting them per container; but the scheduler adds them up across all containers in the Pod and evaluates the total against available node capacity. If a node cannot fit the entire Pod, the Pod does not get scheduled there. We will never end up with half our containers on one node and the other half somewhere else. All containers in a Pod always run on the same node.
This is a fundamental guarantee. Without the Pod abstraction, the scheduler would need to track individual containers, figure out which ones belong together, and ensure they all land on the same machine. That would add more complexity. The Pod makes it simple: one object, one scheduling decision.
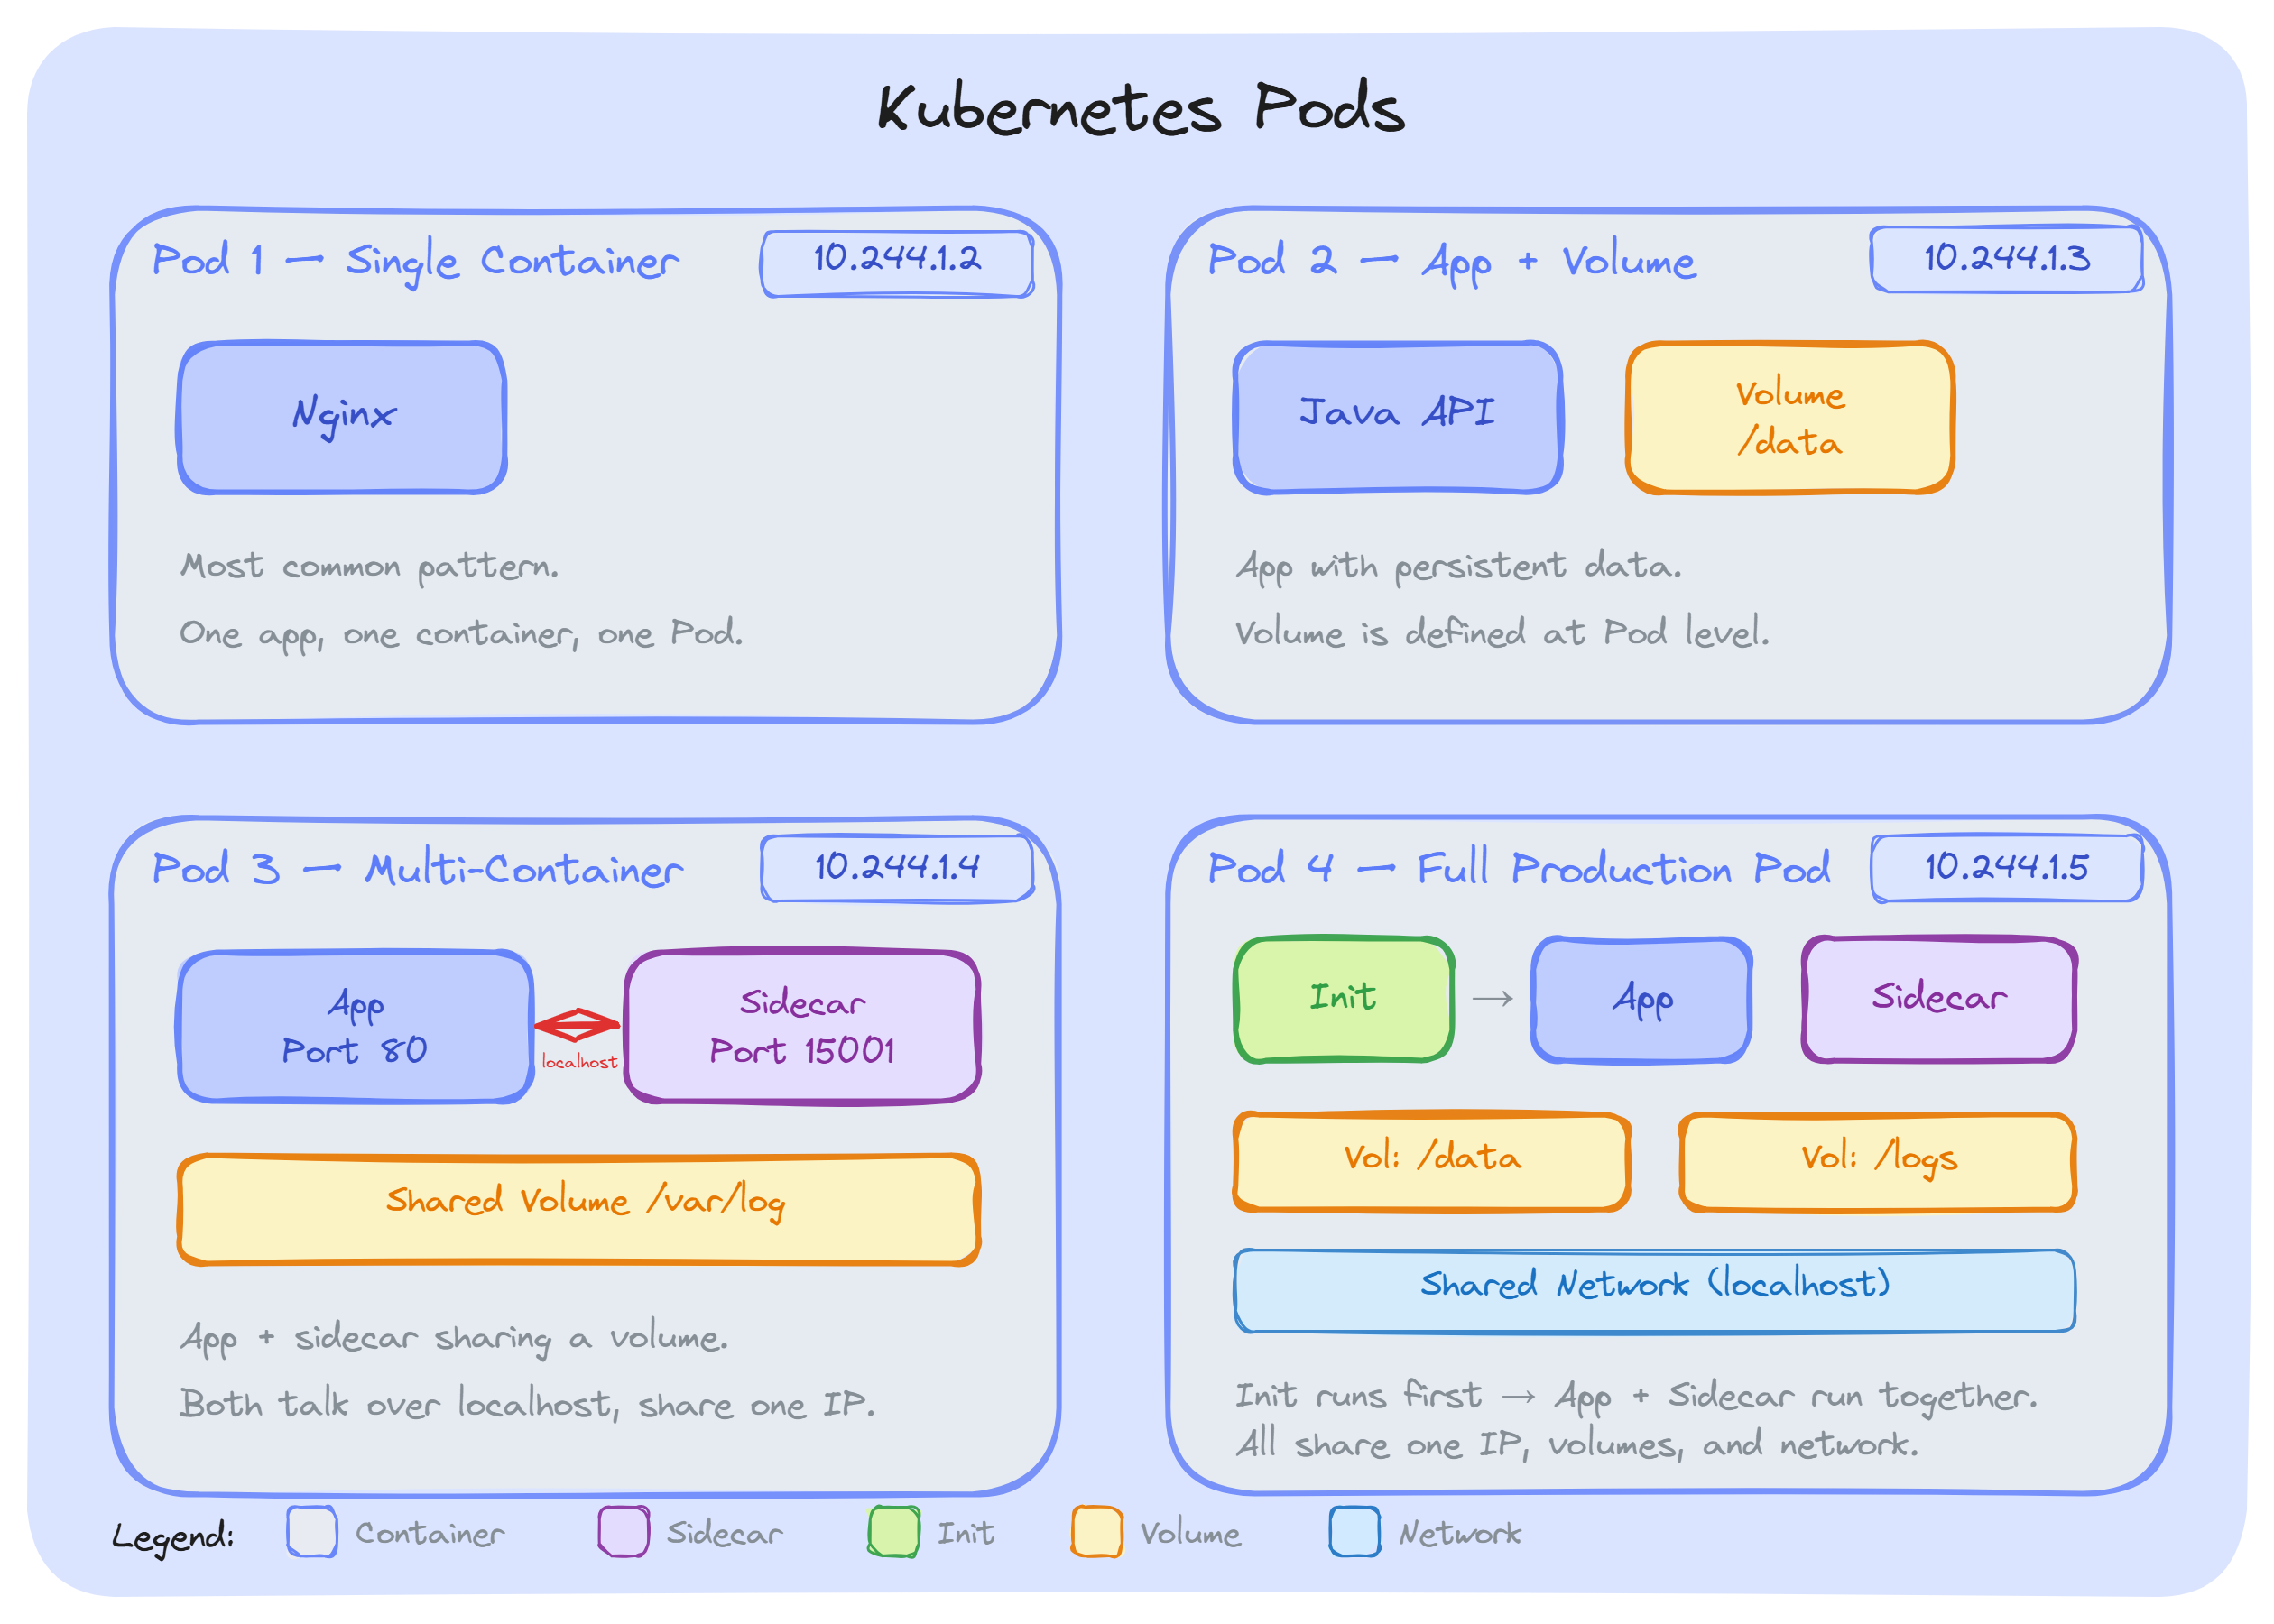
Real-world applications need more than one container working together: a main app with a sidecar proxy, a log collector reading from a shared volume, or an init task that runs before the app starts.
The Pod provides exactly what these containers need to cooperate: a shared network namespace (single IP, localhost communication), shared volume mounts, and a shared lifecycle.
Without Pods, we would need to manually set up networking between containers, coordinate storage, and build custom logic to keep related containers on the same node.
Kubernetes attaches a lot of configuration to our workload; labels, annotations, restart policies, service accounts, security information, tolerations, and affinity rules. These are not container-level concepts. They are part of the overall workload.
The Pod spec is where all of this is present. When a Service selects backends, when a NetworkPolicy filters traffic, when the Horizontal Pod Autoscaler scales our workload; they all operate on Pods, identified by their labels and managed by their spec. A container has none of this information on its own.
Key Takeaway: Everything in Kubernetes operates on Pods, not containers. Once this clicks, most of Kubernetes behavior starts making sense.
Now we know that what a Pod is and why it exists, let's look at what actually happens inside it.
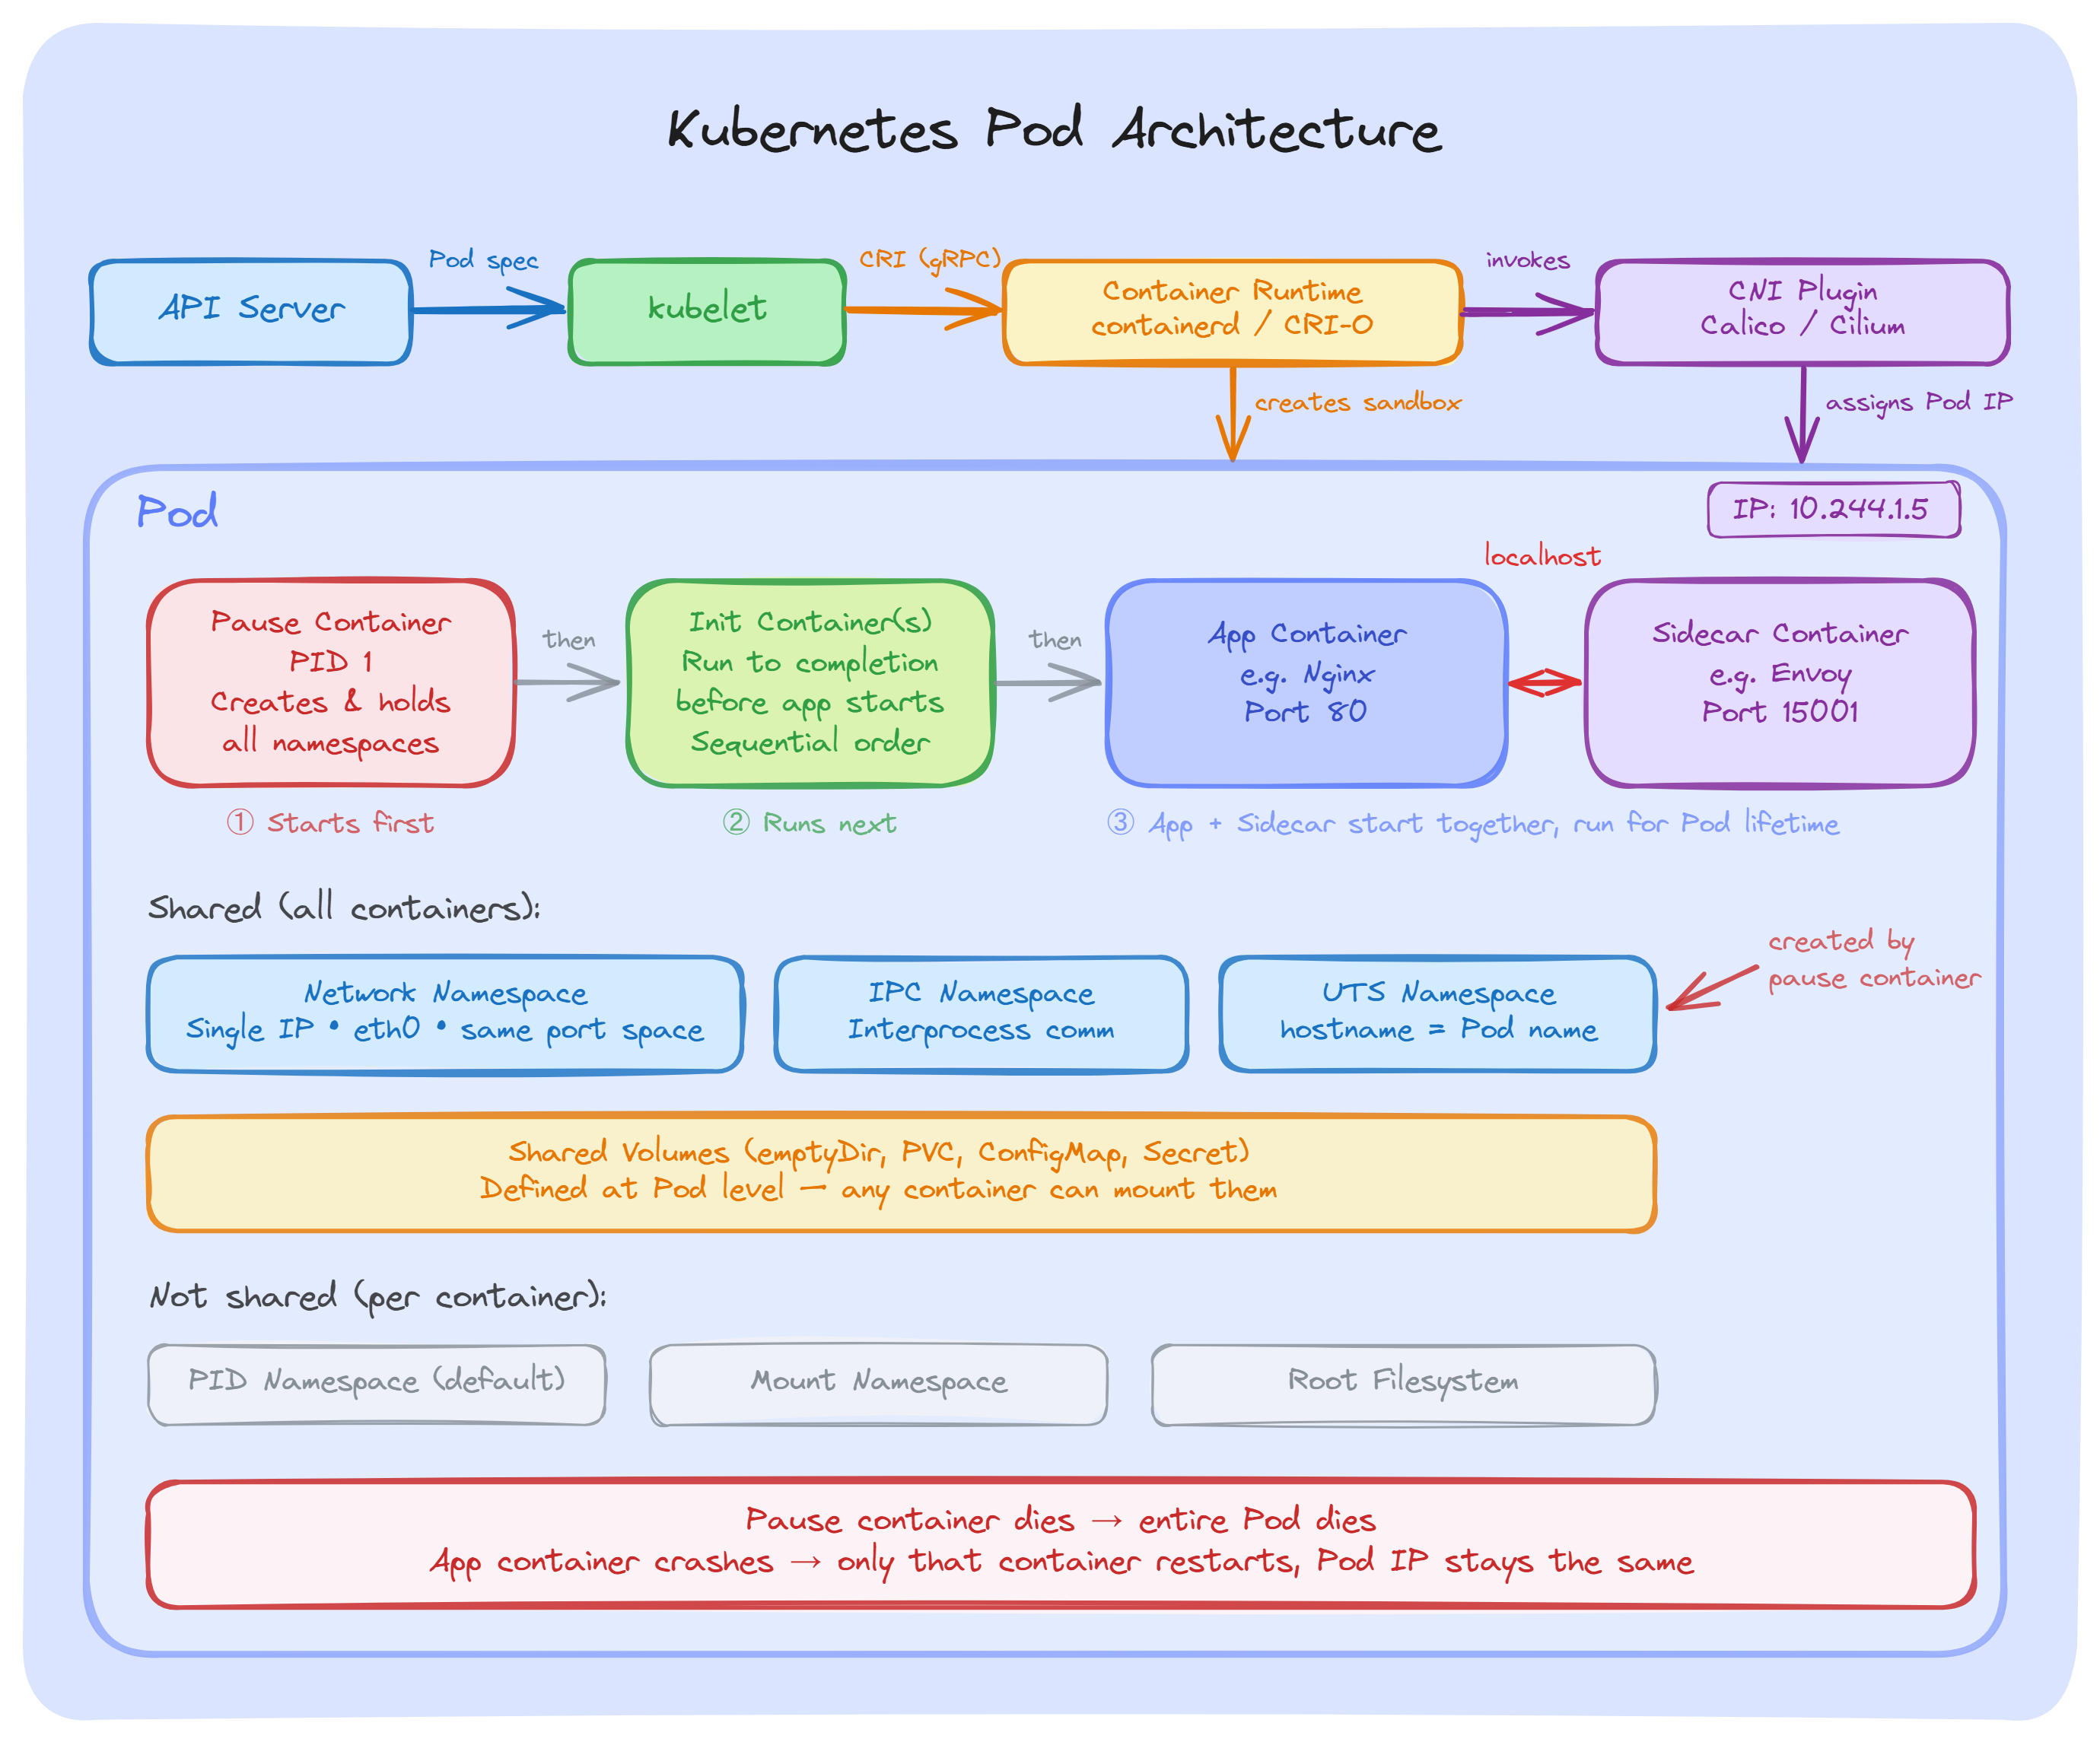
Every Pod has a hidden container called the pause container. The container runtime calls it the Pod sandbox. We never create it ourselves; it is managed entirely by the runtime.
Here is what happens when a Pod is created on a node:
This is why all containers in a Pod share the same IP address and talk to each other over localhost. They are all connected to the namespaces that the pause container set up first.
One important thing to remember; if the pause container dies, the entire Pod is considered dead. But if our application container crashes, the pause container keeps running, the Pod IP stays the same, and only the crashed container gets restarted.
When the Pod sandbox is created, a CNI plugin (Calico, Cilium, or Flannel) attaches a network interface to the Pod and assigns an IP from the cluster's Pod CIDR range( it is the block of IP addresses (defined in CIDR notation) that the cluster reserves specifically for Pods).
From that point, all containers inside the Pod share the same network such as same IP, same ports, same routing table. They reach each other over localhost on different ports.
Since all containers share the same port space, two containers in the same Pod cannot listen on the same port. The second one will fail to start with a bind error.
Volumes are defined at the Pod level, not the container level. Any container in the Pod can mount them.
For example, our main app writes logs to /var/log/app on a shared emptyDir volume. A sidecar mounts the same volume and ships those logs to a central system. Both containers access the same files without any external setup.
Each container still has its own private filesystem. The Shared volumes are the only shared storage; the rest is isolated.
A Pod's phase is a high-level summary of where it is in its lifecycle. We can check it using:
kubectl get pods The output will be, if we have created:
NAME                     READY   STATUS    RESTARTS   AGE
nginx-6799fc88d8-abc12   1/1     Running   0          5m
redis-5b68997f9c-xyz34   1/1     Running   0          2h
The STATUS column shows the current phase. There are five phases:
Let's do hands-on. In this section, we will create a Pod using a YAML manifest, understand each field, and then walk through the essential kubectl commands that we will use daily to manage Pods.
Pod YAML Manifest
Here is a simple Pod spec that runs an Nginx web server. Create a file called nginx-pod.yaml using the following command:
vi nginx-pod.yamlAdd the following YAML (press i to start typing, then press Esc and type :wq to save and exit):
apiVersion: v1
kind: Pod
metadata:
  name: nginx-pod
  labels:
    app: nginx
    environment: dev
spec:
  containers:
  - name: nginx
    image: nginx:1.28
    ports:
    - containerPort: 80
Now, let's understand each field:
apiVersion(v1): Pod belong to the core API group. The version is v1 and this has not changed since the early days of Kubernetes. We will always use v1 for Pod.
kind(Pod): It tells Kubernetes what type of object we are creating. In this case, a Pod.
metadata: It contains information about the Pod:
spec: The desired state of the Pod. This is where we define what containers to run and how.
containers: A list of containers inside the Pod. Each container needs:
After understanding the fields. Let's create the Pod using the following command:
kubectl apply -f nginx-pod.yamlThe output will be:
pod/nginx-pod createdkubectl apply is the standard way to create or update resources. It uses the declarative approach; we describe what we want, and Kubernetes makes it happen.
Now, Inspect the Pod. we can check Pod status using the following command:
kubectl get podsThe output will be:
NAME        READY   STATUS    RESTARTS   AGE
nginx-pod 1/1 Running 0 12sIf we want more details about node placement and Pod IP, then use the following command:
kubectl get pods -o wideThe output will be:
NAME        READY   STATUS    RESTARTS   AGE   IP            NODE
nginx-pod   1/1     Running   0          30s   10.244.1.5    worker-1
Some other useful commands:
If we do not configure resource management for our Pods, we are leaving it up to Kubernetes to guess, and that is not good for production.
Every container in a Pod can have two resource settings; requests and limits. They serve different purposes.
Requests: The amount of CPU and memory that Kubernetes guarantees for our container. The scheduler uses requests to decide which node has enough capacity to run the Pod. If a node does not have enough free resources to fit the Pod's requests, the Pod will not be scheduled there.
Limits: The maximum amount of CPU and memory a container is allowed to use. If a container tries to exceed its memory limit, it gets killed by the kernel (OOMKilled). If it exceeds its CPU limit, it gets throttled; the process slows down but is not killed.
spec:
  containers:
  - name: app
    image: my-app:1.0
    resources:
      requests:
        cpu: "250m"
        memory: "256Mi"
      limits:
        cpu: "500m"
        memory: "512Mi"
In this example, the container is guaranteed 250m CPU and 256Mi memory. It can burst up to 500m CPU and 512Mi memory, but no more.
Note: If you want to go deeper into resource units, how enforcement works under the hood, and see more configuration patterns, check the official Resource Management for Pods and Containers documentation
The Probes are health checks that the kubelet runs against individual containers inside a Pod. They help Kubernetes decide when to restart a container, when to send traffic to it, and when it has finished starting up. Let's discuss them.
There are three types of Probes:
Liveness probe: Is the container still working? If it fails, kubelet restarts the container. We can use it to catch deadlocks or states the application cannot fix on its own. The Pod stays the same; only the failed container restarts.
Readiness probe: Is the container ready for traffic? If it fails, the Pod is removed from Service endpoints. The container is not restarted - it just stops receiving traffic until the probe passes again.
Startup probe: Has the application finished starting? While this probe is running, liveness and readiness probes are disabled. We can use it for slow-starting apps to prevent the liveness probe from killing them during boot.
Note: For more details on how probes work, see the official Pod Lifecycle documentation.
A standalone Pod is a Pod that we create directly; without any controller managing it. If that Pod dies, crashes, or the node goes down, Kubernetes does nothing. The Pod is gone. No replacement, no restart, no recovery.
That is why in production, we always use a controller to manage our Pods. The Controllers watch over our Pods and make sure things stay the way we want; if a Pod dies, the controller creates a new one.
We must know the following controllers:
Note: The Standalone Pods are fine for learning and quick testing. In production, always use a controller. If our Pod is not managed by a Deployment, StatefulSet, DaemonSet, or Job; nothing will bring it back if it fails.
A Pod can contain different types of containers, and each type serves a specific purpose. If we understand them, it helps us to use Pods the right way and avoid common mistakes. The common types are:
This is the container that runs our actual application; our web server, API, worker process, or whatever workload we are deploying. Every Pod must have at least one main container defined in the spec.containers field.
In most cases, a Pod runs a single main container. This is the standard pattern. We only add other container types when our application truly needs them.
Init containers run before any application container starts. They execute one at a time, in the order they are listed, and each one must finish successfully before the next one begins.
The common use cases are:
initContainers:
- name: wait-for-db
  image: busybox:1.37
  command: ['sh', '-c', 'until nslookup postgres-service; do echo waiting; sleep 2; done']
If an init container fails, Kubernetes restarts the entire Pod (based on the restart policy). The app containers will not start until all init containers complete successfully.
The Sidecar containers are long-running helper containers that run alongside our main application for the entire lifetime of the Pod.
The Native sidecars are defined in the initContainers field with restartPolicy: Always. This tells Kubernetes to:
initContainers:
- name: log-shipper
  image: fluent/fluent-bit:latest
  restartPolicy: Always
  volumeMounts:
  - name: app-logs
    mountPath: /var/log/app
The common sidecar use cases are:
The Ephemeral containers are temporary containers that we inject into a running Pod for debugging purposes. They are not defined in the Pod spec; we add them on-demand using kubectl debug.
This is useful when our application image is minimal and has no shell, no curl, no networking tools. Instead of rebuilding the image, we attach an ephemeral container with the tools we need.
A few things to keep in mind:
A static Pod is a Pod that the kubelet manages directly on a node; without going through the API server or the scheduler.
We can create a YAML file and place it in the kubelet's static Pod directory (default: /etc/kubernetes/manifests/). The kubelet watches this directory; if we add a file, it creates the Pod. If we remove the file, it deletes the Pod. No kubectl apply needed.
Since the API server does not create static Pods, it has no record of them. To make them visible in kubectl get pods, the kubelet creates a mirror Pod; a read-only copy of the static Pod in the API server. But we cannot control it through kubectl. If we want to delete the mirror Pod, the kubelet just recreates it.
Where will we see static pods?
The most common use of static Pods is the Kubernetes control plane in kubeadm clusters. These four components run as static Pods:
In day-to-day work, we will rarely create static Pods ourselves. They exist mainly for cluster bootstrapping, getting the control plane running before the API server even exists.
By default, containers run with more access than they need. If we do not lock them down, an attacker who gets into a container can do serious damage. Here is how we can secure them:
A SecurityContext controls what a container is allowed to do. We set it at the Pod level or the container level.
Key fields to always configure:
spec:
  securityContext:
    runAsNonRoot: true
  containers:
  - name: app
    image: my-app:2.0
    securityContext:
      readOnlyRootFilesystem: true
allowPrivilegeEscalation: falseKubernetes has three Pod Security Standards:
We can enforce these per namespace using Pod Security Admission:
apiVersion: v1
kind: Namespace
metadata:
  name: production
  labels:
    pod-security.kubernetes.io/enforce: restricted
pod-security.kubernetes.io/warn: restrictedThese are the practices that matter most when running Pods in real production clusters. If we skip these, we will spend more time fixing problems than building features.
Pods are the core building block of Kubernetes; every workload we run, from Deployments to Jobs, manages Pods behind the scenes. Kubernetes schedules, monitors, and manages Pods, not containers.
In production, always use controllers to manage our Pods, set resource requests and limits, configure health probes, and apply security standards.
If we understand how Pods work internally, it makes troubleshooting faster and our clusters more reliable.