Kubernetes Tutorial for Beginners: Basic to Advance
Tania Duggal
Founder
|
January 6, 2026
When your containerized application grows from 3 to 300 pods, things start breaking. This is not because of bad code, but because managing containers manually does not work or scale easily. You can’t keep restarting, rescheduling, or reconnecting every container by hand. This is exactly where Kubernetes (K8s) comes in. This Kubernetes tutorial is for everyone who wants to learn what Kubernetes is, how it works, what its architecture looks like, and why it's so important for running cloud-native applications on a large scale.
Let’s dig in!
What is Kubernetes?
Kubernetes, also known as K8s, is an open-source platform that automates how you deploy, scale, and manage containerized applications. Instead of running containers manually on individual servers, Kubernetes organizes them into cluster(groups of machines that act like one single system).
At its core, Kubernetes is a container orchestration or managing system. It makes sure the applications you run are always in the desired state: healthy, balanced across nodes, and automatically recovered if something fails. You define what you want, and Kubernetes figures out how to make it happen.
Kubernetes is like the brain of your container infrastructure. It decides where containers should run, how they communicate, when to scale, and when to restart or replace them if something goes wrong.
History of Kubernetes
Kubernetes was originally created at Google, based on years of experience managing production workloads at scale with systems like Borg and Omega. In 2015, Google donated it to the Cloud Native Computing Foundation (CNCF), where it continues to evolve as one of the most active open-source projects in the world.
Today, Kubernetes powers everything from small developer setups to massive enterprise clusters at scale. It’s the backbone of modern DevOps, microservices, and cloud-native computing; used by organizations like Spotify, Netflix, Shopify, and countless startups.
Why Kubernetes?
When containers became popular, they changed everything about how we build and deploy applications. Docker made it easy to package an app with all its dependencies, ensuring it runs the same on a laptop, a test server, or in production.
But as soon as teams started running hundreds or thousands of containers, new problems showed up in the operations. It was no longer possible to manage containers using shell scripts or Docker commands.
Suppose we have to do:
Restart containers if one crashes.
Balance load across multiple servers.
Roll out updates without downtime.
Make sure services can discover and talk to each other.
Doing this by hand is time-consuming, error-prone, and impossible to scale. Oops...
That is exactly why Kubernetes was created; to bring automation, orchestration, and reliability to containerized systems.
Kubernetes - Automation, Orchestration, Reliable & containerized system
The 2024-2025 Cloud Native Survey from CNCF found that 93% of organizations are using, testing, or looking into Kubernetes. This shows how much it has changed the way cloud infrastructure works today.
Kubernetes as a Declarative System
Kubernetes introduces a declarative model; you tell it what you want (for example, I need 5 replicas of this service), and it figures out how to make that happen.It continuously checks the current state of your cluster and compares it with your desired configuration. If something drifts, Kubernetes corrects it automatically.
Kubernetes Core Building Blocks
Before we go deeper into the architecture and working, let's take a look at the most important parts of a Kubernetes cluster.
Cluster: A Kubernetes cluster is the full environment that runs your workloads. It’s a collection of physical or virtual machines that act as a single system. Inside a cluster, there are two main layers: the Control Plane and Worker Nodes which we discussed below.
Node: A node is a single machine (physical or virtual) within the cluster. Each node runs the key components required to host and manage containers. It has three components: kubelet, kube-proxy and container runtime which we also discussed below.
Pod: A Pod is the smallest deployable object in Kubernetes. It acts as a wrapper around one or more containers that work together as a single unit and share resources such as storage and network.
Deployment: A Deployment defines how your application should run - including how many Pods to run, which version of your container image to use, and how updates should be rolled out.
Service: A Service ensures that your Pods remain reachable even when they’re recreated or rescheduled across different nodes. Since Pods are short-lived, a Service provides a stable network identity that doesn’t change, allowing reliable communication inside or outside the cluster.
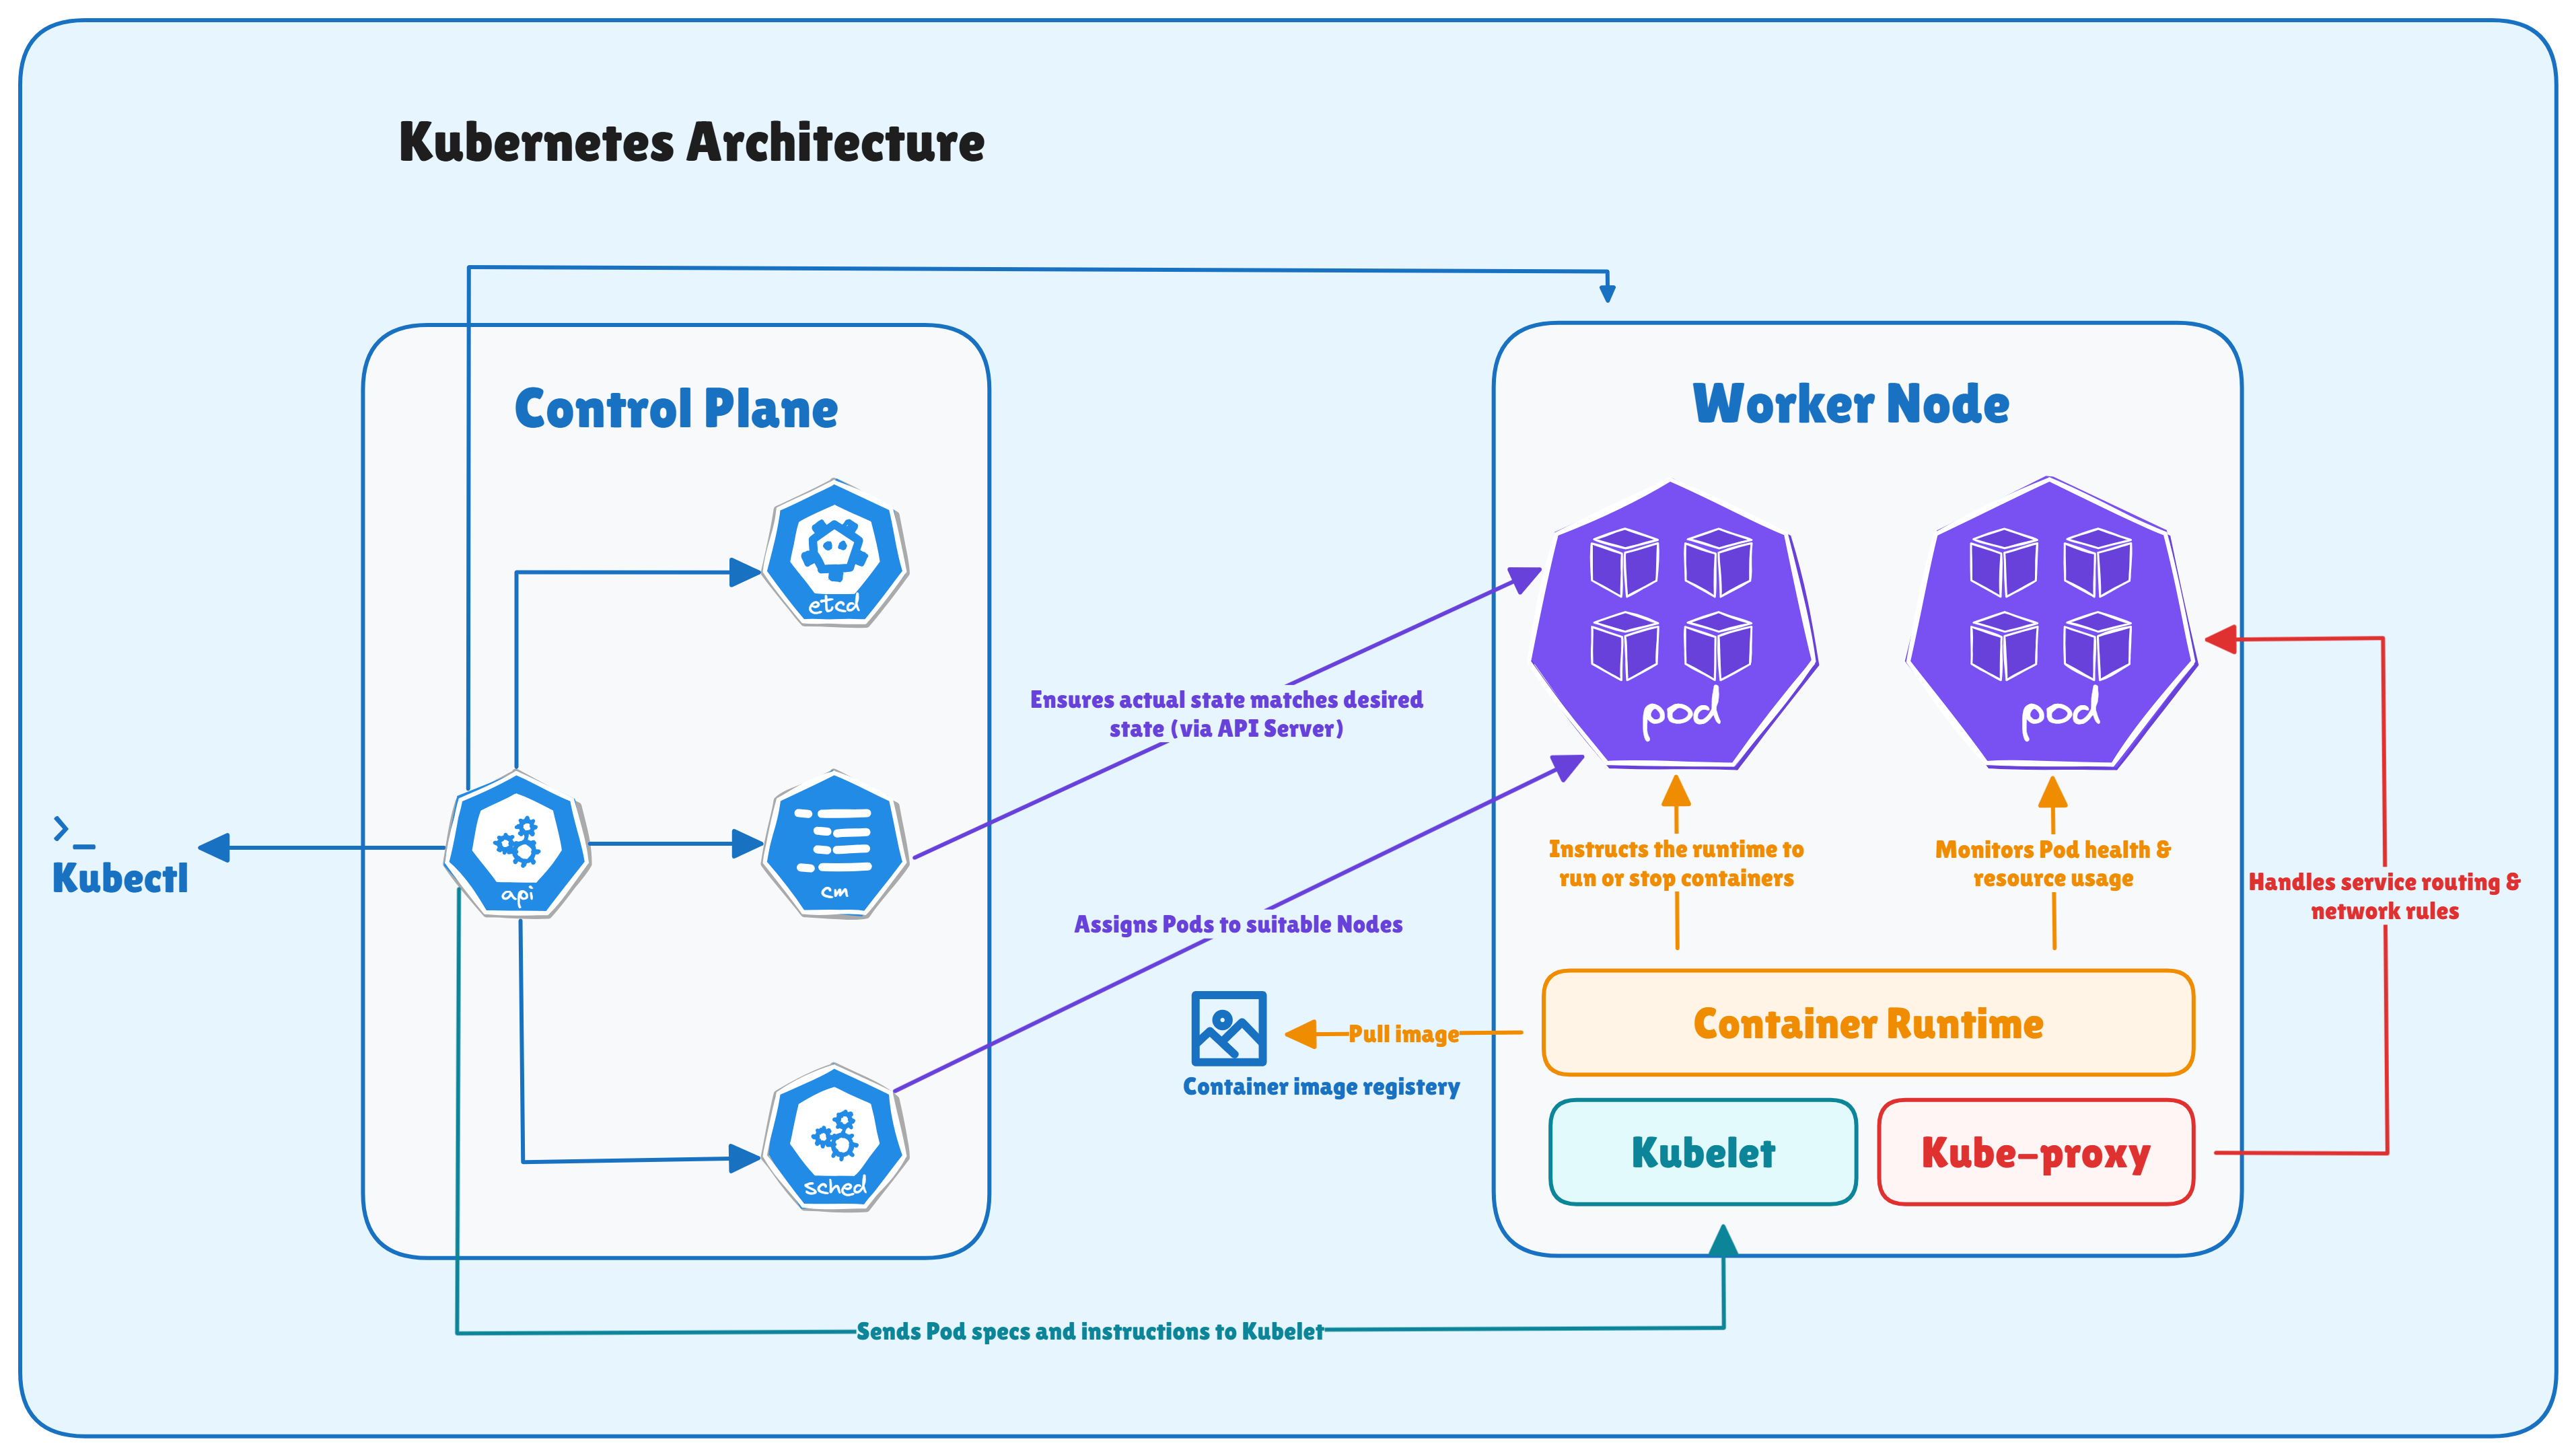
Kubernetes Architecture
At its heart, Kubernetes architecture follows a simple idea: divide responsibilities - let the Control Plane makes global decisions, like scheduling, scaling, or responding to failures, and let the Worker Nodes carry out those decisions by running Pods.
You can think of it simply as:
Control Plane: the brain of the cluster.
Worker Nodes: the hands that run the containers.
Control Plane Components
Each Control Plane component has a specific job, but they all work together. Let’s discuss the components:
API Server: The API Server (kube-apiserver) is the front door to your cluster. Every interaction with Kubernetes - CLI commands, dashboards, controllers, or even automation scripts, goes through the API server. It validates requests, updates the cluster’s state, and communicates with all other components. The API server is the gateway that connects users and internal processes to Kubernetes.
etcd: etcd is a key-value store or database that acts as the single source of truth for the cluster. It stores the entire configuration and state of the cluster - which Pods exist, which nodes they run on, secrets, ConfigMaps, etc. Note: Because of its critical role, etcd is designed for consistency and high availability (HA).
Controller Manager: The Controller Manager runs multiple background loops called controllers. Each controller (ReplicaSet, Deployment, StatefulSet, DaemonSet, etc.) watches the current state of the cluster and makes sure it matches the desired state.
Scheduler: The Scheduler decides where each Pod should run. When a Pod is created, it starts in a “Pending” state until the Scheduler finds a suitable node based on resource availability and policies. It considers factors like CPU and memory requests, node affinity/anti-affinity, taints, and tolerations before assigning Pods.
Worker Node Components
Each Worker Node is a machine (VM or physical) that runs your container workloads. Let’s discuss the components:
Kubelet: The kubelet is the node agent that communicates directly with the API Server. It receives Pod definitions and ensures the containers described in those Pods are running and healthy. If a container dies, kubelet restarts it automatically (depending on the Pod’s restart policy).
Kube-Proxy: kube-proxy handles networking for services inside the cluster. It maintains network rules so that pods can communicate with each other, even across nodes.
Container Runtime: The container runtime is the low-level engine that actually runs your containers. It pulls images, starts containers, and reports back their status to the kubelet. Kubernetes supports multiple runtimes like containerd, CRI-O, or Docker (via shim).
Kubernetes Architecture
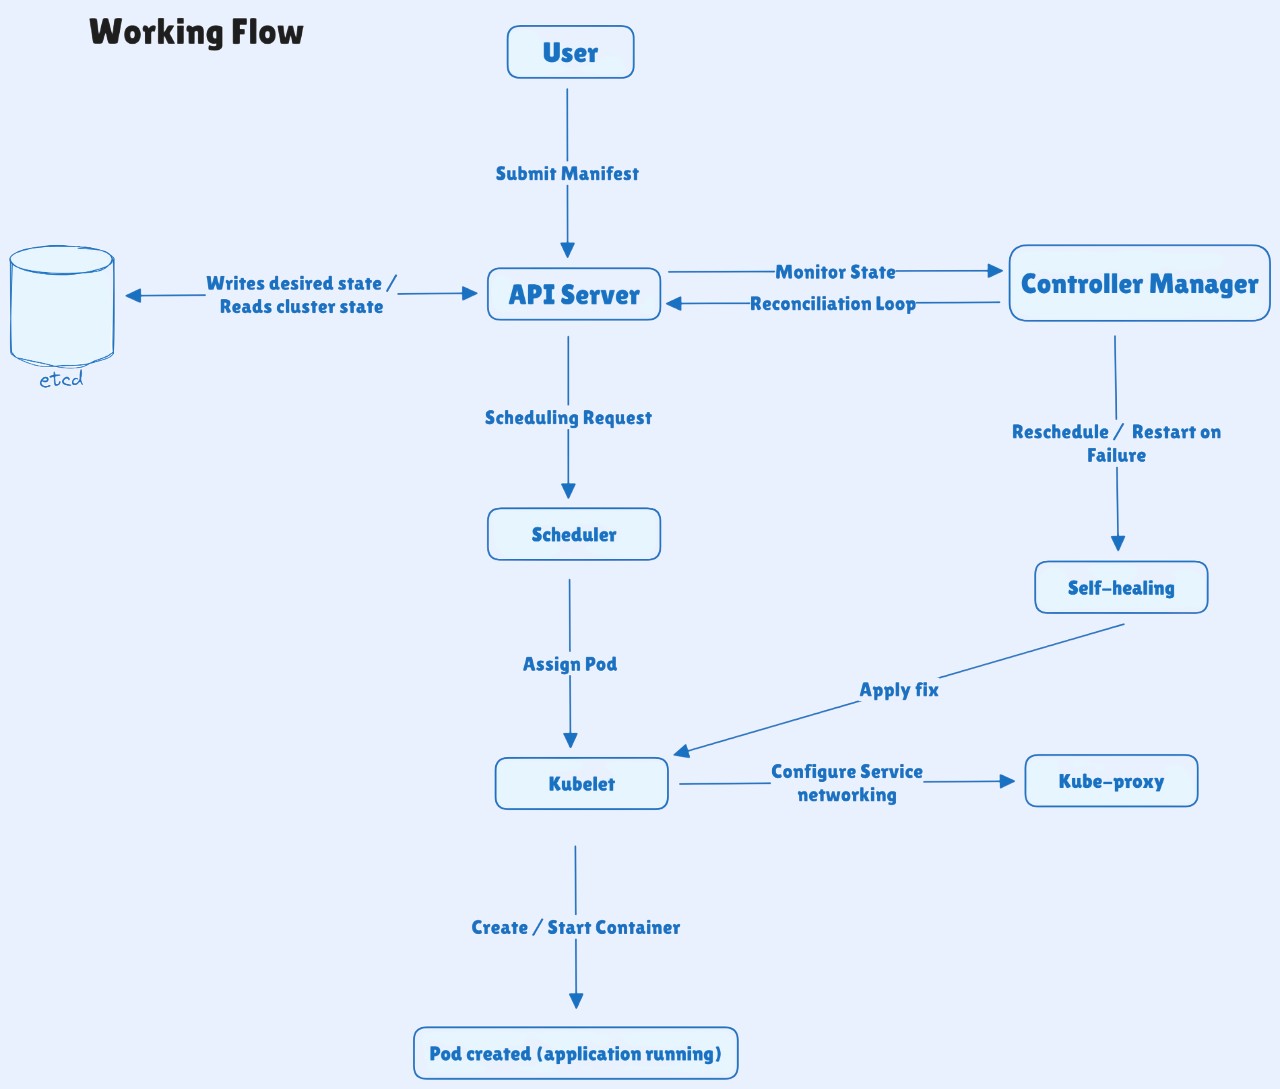
How does Kubernetes work?
This is how things usually work in a Kubernetes cluster:
You define your desired state using a YAML manifest or a kubectl command (for example, a Deployment or Service).
The API Server receives and validates your request, then updates the cluster’s state in etcd.
The Scheduler looks at all available nodes and decides where each Pod should run.
The kubelet on the selected node pulls the container image, creates the Pod, and starts the container.
The Controller Manager keeps watching everything - ensuring the actual state matches what you have declared.
The kube-proxy sets up networking rules so Pods and Services can communicate securely across the cluster.
If something fails - like a node crash or a container going down - Kubernetes detects it and automatically heals the system by rescheduling or restarting workloads.
This continuous feedback loop between the desired state (what you declare) and the actual state (what’s running) is what makes Kubernetes self-managing and reliable.
Working Flow
Kubernetes Core Components
Now that you understand how Kubernetes works, let’s start with core components you will work with every day. These are the objects you create and manage inside your kubernetes cluster.
Labels and Selectors: Labels are key-value pairs you attach to objects (like Pods, Nodes, or Services) to organize and identify them. Selectors use those labels to find and manage specific resources.
ReplicaSets: A ReplicaSet ensures that the desired number of Pods is always running in your cluster. If a Pod crashes or gets deleted, the ReplicaSet immediately creates a new one to maintain balance.
StatefulSets: A StatefulSet is designed for applications that need stable storage and consistent network identities. Each Pod in a StatefulSet has a unique name and retains its data even after restarts - ideal for databases or message queues.
DaemonSets: A DaemonSet ensures that a copy of a specific Pod runs on every node (or selected nodes) in your cluster. It’s commonly used for system-wide agents like log collectors, monitoring daemons, or network plugins.
ConfigMaps: A ConfigMap stores non-sensitive configuration data - such as environment variables, file paths, or feature flags. You can update configurations without rebuilding or redeploying your container image.
Secrets: A Secret works just like a ConfigMap but is meant for sensitive data like passwords, API keys, or certificates. Secrets are stored in base64-encoded form and can be encrypted at rest.
Persistent Volumes (PV) and Persistent Volume Claims (PVC): Pods are temporary, but your data is not. A PersistentVolume (PV) is a kind of storage in the cluster, and a PersistentVolumeClaim (PVC) is a request from a user to get that storage.
Affinity, Tolerations, and Node Selection: These features control where your Pods run. Node affinity ensures Pods are placed on nodes with specific labels. Pod anti-affinity prevents certain Pods from running together. Taints and tolerations mark nodes as restricted, so only allowed Pods can run there.
Ingress : An Ingress acts as the entry gate to your cluster. It routes external HTTP or HTTPS traffic to the right Services based on rules like domain name or URL path. In modern Kubernetes setups, many teams are moving toward Gateway API as the newer, more flexible alternative.
Networking in Kubernetes
Networking is the backbone of how Kubernetes applications communicate - between Pods, across nodes, and with the outside world. Let’s look at how Kubernetes handles connectivity, discovery, and security inside a cluster.
Pod-to-Pod Communication (CNI): In Kubernetes, every Pod gets its own IP address, allowing it to talk directly to other Pods - even those running on different nodes. This seamless communication is made possible by the Container Network Interface (CNI) plugins like Calico, Flannel, or Cilium, which set up the underlying virtual network.
Service Discovery and DNS: Since Pods are temporary, their IPs change frequently. Services provide a stable name and IP address for a group of Pods, ensuring consistent connectivity. Kubernetes also runs CoreDNS, which automatically creates internal DNS records - so applications can reach others using names like backend.default.svc.cluster.local instead of hardcoded IPs.
Service Types in Kubernetes: Kubernetes offers multiple Service types, each for a specific use case.
ClusterIP - internal communication only.
NodePort - exposes the Service on a static port on each node.
LoadBalancer - connects your Service to the outside world via a cloud load balancer.
Ingress vs Services: Services expose workloads at the network level (Layer 4), Ingress handles web traffic (Layer 7). An Ingress Controller - like NGINX or Traefik - routes external HTTP/HTTPS requests to the right Service based on hostnames or paths.
Network Policies (Traffic Control): By default, all Pods can talk to each other. Network Policies let you control communication between Pods by defining which connections are allowed. It is kind offirewall inside the cluster.
Scaling, Updates & Self-Healing in Kubernetes
One of the best things about Kubernetes is how it handles change. Let’s see how it keeps your applications healthy and available, all the time.
Horizontal Pod Autoscaler (HPA) - Automatic Scaling: The Horizontal Pod Autoscaler (HPA) watches resource usage like CPU or memory and automatically adds or removes Pods based on demand. For example, if traffic spikes, Kubernetes spins up more Pods. When things calm down, it scales back to save resources. This ensures your app always has enough capacity - no manual effort needed.
Vertical Pod Autoscaler (VPA): While HPA scales out, the Vertical Pod Autoscaler (VPA) scales up or down - adjusting CPU and memory requests of existing Pods automatically. It learns from your application’s usage patterns and right-sizes Pods over time, so you are not over-allocating or under-provisioning resources. For example, if a service consistently uses more memory than requested, VPA increases its allocation. If usage drops, it scales resources down - improving efficiency without affecting performance.
Rolling Updates & Rollbacks - Zero Downtime Releases: Kubernetes lets you release new versions without taking your app offline. During a rolling update, it replaces old Pods with new ones gradually, keeping your app available the whole time. If something goes wrong, you can instantly roll back to the previous version. This built-in deployment model makes updates safer and more predictable.
Probes - Health Checks that Keep Application Reliable: Kubernetes constantly checks if your application is working as expected. It uses three types of probes.
Liveness probe - checks if the app is still running.
Readiness probe - checks if the app is ready to serve traffic.
Startup probe - gives slow-starting applications more time before checks begin. If a container fails a liveness check, Kubernetes restarts it automatically based on the restart policy.
Self-Healing in Action: Kubernetes never stops watching your cluster. If a Pod crashes, it creates a new one. If a node fails, it moves the workloads to another healthy node.
Fine-Tuning Resources for Stability: Every Pod in Kubernetes can define how much CPU and memory it needs. Setting these limits correctly helps Kubernetes balance workloads and prevents one app from overusing resources. It also ensures critical application always get the resources they need when the cluster is under pressure.
Getting Started with Kubernetes
Let’s walk through the easiest ways to start using Kubernetes, whether you are learning locally or working in the cloud.
1. Local Kubernetes Labs: If you’re just getting started, you don’t need a cloud account. You can run a small Kubernetes cluster right on your machine using one of these tools:
Minikube: The most popular local option. It sets up a single-node cluster in a VM or Docker container. It is great for beginners.
Kind (Kubernetes in Docker): Lightweight and fast - it runs clusters inside Docker containers. It is perfect for testing configurations and CI pipelines.
k3s: A minimal, production-grade Kubernetes distribution by SUSE. It is ideal for edge devices, Raspberry Pi setups, or low-resource machines. Each of these gives you a real Kubernetes environment to deploy, scale, and test applications without cloud costs or complex setup.
2. Cloud Options(EKS, GKE, and AKS): When you’re ready to move beyond local labs, every major cloud provider offers a managed Kubernetes service:
Provider
Service
Key Strength
Amazon EKS
Elastic Kubernetes Service
Deep AWS integration and IAM security
Google GKE
Google Kubernetes Engine
Fast updates and best default configurations
Azure AKS
Azure Kubernetes Service
Easy setup, great for Microsoft stack users
3. Essential kubectl Commands: Once your cluster is running, you will use kubectl - the Kubernetes command-line tool - to interact with it. Here are the most common commands:
kubectlgetpods# List running podskubectldescribepod<pod-name># Inspect a pod's detailskubectllogs<pod-name># View container logskubectlapply-fapp.yaml# Deploy resources from a YAML filekubectldelete-fapp.yaml# Remove resources
Kubernetes Real-World Use Cases
From small startups to global enterprises, it powers everything from microservices to AI workloads:
Microservices Deployments: Most teams start using Kubernetes to run microservices - applications broken into small, independent components that communicate through APIs. Kubernetes handles the complexity of deploying and managing hundreds of these microservices by automating scaling, service discovery, and networking.
CI/CD Workflows: Kubernetes fits perfectly into modern DevOps pipelines. With tools like Jenkins, GitHub Actions, GitLab CI, and ArgoCD, teams can automate building, testing, and deploying code changes into clusters in minutes. You can define your application’s desired state as code (YAML), store it in Git, and let Kubernetes pull updates automatically - this is the foundation of GitOps.
AI/ML Workloads: AI and ML teams use Kubernetes to manage GPU-powered workloads like model training, batch processing, and inference at scale. With the Device Plugin API and Dynamic Resource Allocation (DRA), Kubernetes can schedule GPUs and specialized hardware automatically, without manual setup.
Multi-Tenant Clusters: Large enterprises often run multi-tenant clusters, where multiple teams or applications share the same Kubernetes environment safely. Namespaces, RBAC (Role-Based Access Control), and Network Policies help isolate workloads and enforce security boundaries while sharing infrastructure efficiently.
Infrastructure as Code (IaC): Kubernetes embraces Infrastructure as Code (IaC) by design. Everything - from Deployments to networking and storage - is declared in YAML manifests. That means your infrastructure is version-controlled, repeatable, and reviewable.
Monitoring and Observability: Running production workloads without visibility is like flying blind. Kubernetes integrates seamlessly with Prometheus, Grafana, and ELK to monitor performance, logs, and cluster health. You can track everything - from Pod CPU usage to API server latency - and even trigger alerts or auto-scaling actions.
Conclusion
Kubernetes has become much more than a container orchestrator - it’s the foundation of how modern applications are deployed, scaled, and managed across environments.
It brings together automation, observability, and resilience into one powerful, declarative system. Whether you’re running a few services or managing thousands of Pods, Kubernetes ensures your workloads stay healthy and aligned with your desired state.