
You have seen this before; your Kubernetes cluster looks perfect - pods are running, CPU is low, memory is fine, no alerts. But your application feels slower. Latency is higher. Users start noticing.
You check your dashboards again - no red flags. The node is half idle. Still, requests are taking longer than usual.
We faced this same problem once. Our APIs were healthy, but P99 latency had doubled. We checked everything - load balancer, GC, network, autoscaler. Nothing worked. In the end, we found the real problem right in front of us: how Kubernetes handles CPU time.
Most teams set CPU and memory resources by default, thinking they’re protecting stability.But under the hood, Kubernetes doesn’t behave the way many assume. Sometimes, those same settings that look safe are actually slowing your containers down.
TL;DR ⚡
Kubernetes CPU limits can throttle your containers. Even when the node has free CPU, the kernel may pause your pods once they hit their CPU quota.
Kubernetes controls CPU use with the Linux CFS scheduler. If a container uses all its allowed CPU time too quickly, the kernel stops it until the next CFS period.
What You’ll Learn
Let's start with the basics; most people think they already know but don't really. In Kubernetes, every container can ask for and control its use of two key resources: CPU and memory. Let's discuss these:
A request tells Kubernetes how much of a resource your container needs to run smoothly.
When you deploy a Pod, the scheduler checks the CPU and memory requests and finds a node that can handle them. If your Pod requests 500m CPU (0.5 core) and 512Mi memory, Kubernetes won’t place it on a node without that much free capacity.
Think of it as your minimum guaranteed budget - the scheduler ensures your Pod is placed on a node that can provide at least this much.
CPU Request: determines CPU weight at runtime and scheduling placement.
Memory Request: determines how much memory must be available on the node before scheduling.
Note: 1 CPU = 1 vCPU or 1 core, 1000m (millicores) = 1 CPU, 512Mi ≈ 0.5 GiB.
A limit is different. It doesn’t affect scheduling; it controls what happens at runtime. The kubelet passes the limit to Linux cgroups, which use the CFS (Completely Fair Scheduler is the default Linux CPU scheduler that distributes CPU time proportionally among runnable processes) quota system to enforce it.
CPU limit: if the container hits its CPU limit, it will be throttled. We will go under the hood in the upcoming section.
Memory limit: Memory is not throttled. If your container crosses its limit, the kernel’s OOM killer terminates it. This is a hard stop.
Example: Requests and Limits in YAML
apiVersion: v1
kind: Pod
metadata:
  name: demo-app
spec:
  containers:
    - name: web
      image: nginx
      resources:
        requests:
          cpu: "500m"
          memory: "512Mi"
        limits:
          cpu: "1"
          memory: "512Mi"
In this example:
Kubernetes groups pods into Quality-of-Service (QoS) classes based on how you set requests and limits. Kubernetes relies on this classification to decide which Pods to evict when there are not enough available resources on a Node.
Note: QoS does not affect throttling - throttling still depends on CPU limits.
When we talk about “resources” in Kubernetes, we are talking about two layers working together:
When you create a Pod, the scheduler looks at all available nodes and checks:
The scheduler binds the Pod to that node if it fits. No CPU or memory is given yet, only planned. At this point, limits don't mean anything. The scheduler only looks at requests.
Once a node is selected, the kubelet (the agent running on that node) takes over. It’s responsible for actually starting the Pod’s containers and applying the resource constraints.
Here’s what happens:
At this point, Kubernetes gives control to the Linux kernel.
Once your Pod starts running, Kubernetes steps aside and the Linux kernel takes over. This is where cgroups come in. They decide how much CPU and memory your container can actually use.
Let's look at how CPU and memory work in different ways:
CPU
There are two cgroup settings that manage how much CPU is used:
Important: cpu.weight does not reserve CPU – it only defines priority.
cpu.max = <quota> <period>This is the format of the CPU limit setting in cgroup v2.
Quota: This is the total amount of CPU time the cgroup can use within a given period (in microseconds).
Example: if you set a CPU limit of 200m (0.2 CPU) and your period is 100000µs (100ms), the quota will be 20000µs (20ms) per 100ms period, so:
cpu.max = 20000 100000
Period: This is the duration of that “CPU period” window (in microseconds). A very common default is 100000µs (100ms). This period is the time frame within which the CPU quota is enforced.
If the container consumes that 20ms early in the 100ms window, it will be paused for the rest of the window and can run again only when the next 100ms period starts, even when the node has free CPU available. This pause is known as throttling, and that is why CPU limits often create unpredictable latency.
Note for Multi-Threaded Workloads: In this article, we were considering single-threaded workloads. But for multi-threaded workloads, multiple threads can run at the same time and consume that quota faster, so throttling shows up more often and latency gets worse.
When No CPU Limit is set; CFS skips the quota mechanism entirely.
CPU request → cpu.weight → controls fairness
CPU limit   → cpu.max    → enforces a hard cap (throttling)
Memory
Memory doesn’t work like CPU. There’s no “quota window” - it’s just a cap.
The cgroup file memory.max defines the absolute limit. If a container tries to go over it, the kernel doesn’t throttle - it kills the process using the OOM (Out Of Memory) killer.
That’s why memory limits are strict and must match your application’s actual usage pattern. Unlike CPU, memory can’t be “borrowed” from idle pods.
Note: with MemoryQoS, the kernel can also apply reclaim pressure / throttling behavior using memory.high before you hit memory.max.
                               THE WHOLE FLOW

                     +----------------------------------+
                     |         Kubernetes API            |
                     +----------------------------------+
                                   |
                                   ▼
                     +----------------------------------+
                     |            Scheduler             |
                     |  - Uses resource requests        |
                     |  - Selects a node                |
                     +----------------------------------+
                                   |
                                   ▼
                     +----------------------------------+
                     |             Kubelet              |
                     |  - Starts containers             |
                     |  - Creates cgroups               |
                     |  - Passes CPU/memory settings    |
                     |    to container runtime          |
                     +----------------------------------+
                                   |
                                   ▼
                     +----------------------------------+
                     |          Linux cgroups           |
                     |  - cpu.weight  (fair share)      |
                     |  - cpu.max     (CPU limit)       |
                     |  - memory.max  (hard cap)        |
                     +----------------------------------+
                                   |
                                   ▼
                     +----------------------------------+
                     |            Container             |
                     |  - Gets fair CPU time            |
                     |  - Throttled if CPU exceeded     |
                     |  - OOMKilled if memory exceeded  |
+----------------------------------+This rule stops most common production problems because of how Kubernetes works internally and how the kernel handles memory.
If request < limit, the scheduler assumes your pod needs only the request amount. Later, when the pod grows toward the limit, the node may not have enough memory(OOM kills). Keeping the request equal to the limit fixes this mismatch.
If all containers in the pod have equal memory request and limit, Kubernetes classifies it as Guaranteed QoS.
Benefits:
You know exactly how much memory the pod can use.
This makes:
No unexpected memory spikes beyond the configured limit, so failures become predictable.
We will walk through the experiment phase by phase and observe what actually happens.
We started with the simplest possible setup with two BestEffort pods - no CPU request, no CPU limit.
Once both pods were running, we applied continuous CPU load inside them.
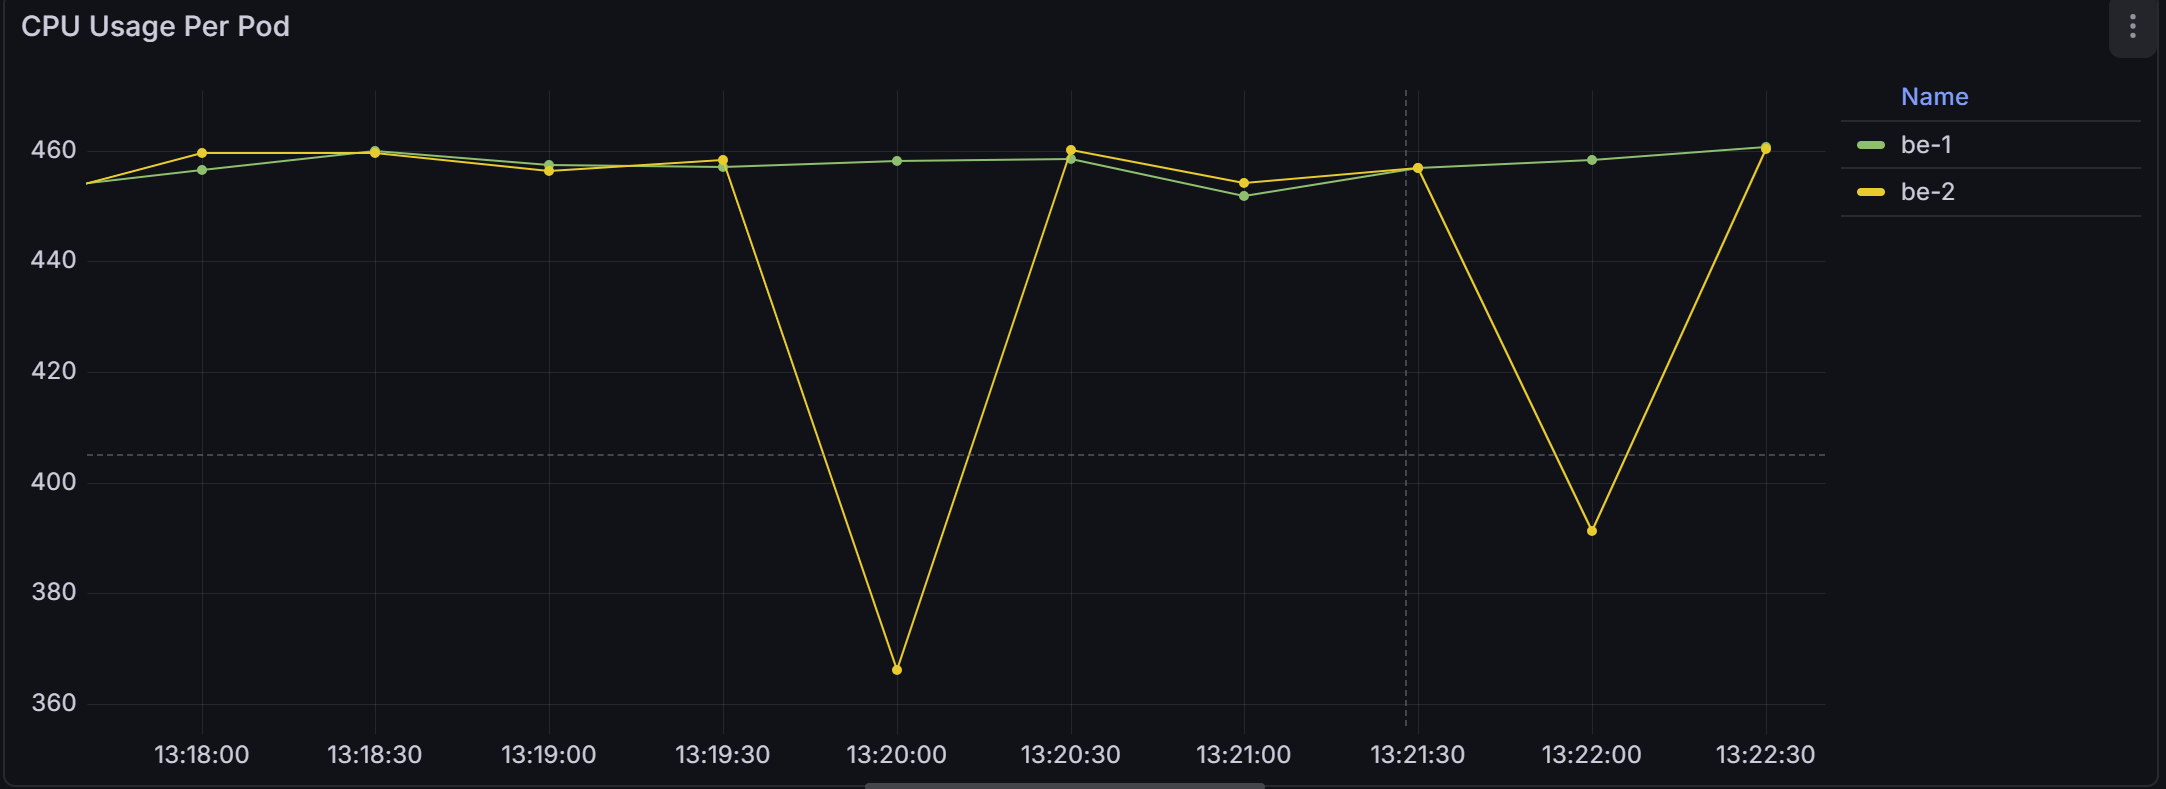
If you look at the CPU usage graph, the behavior is very clear; be-1 and be-2 stayed around 450-460 millicores.
Together, they consumed almost the entire CPU capacity available on the node. The split was nearly equal.
Why?
This happens because neither pod defined a CPU request. Therefore, Kubernetes assigned both of them the lowest possible cpu.weight. Since both weights were equal, the Linux scheduler divided CPU (or CPU time) proportionally, which in this case meant evenly.
There was no reservation and no prioritization. Just fair sharing.
Note for Throttling: When no limit is set in Kubernetes, kubelet does not configure a cpu.max quota for the container’s cgroup. Without cpu.max, the kernel has no quota window to enforce. And without a quota, there is nothing to throttle.
After observing how BestEffort pods behave alone, we introduced two Guaranteed pods - request = 200m, limit = 200m.
The moment the Guaranteed pods started running under load.
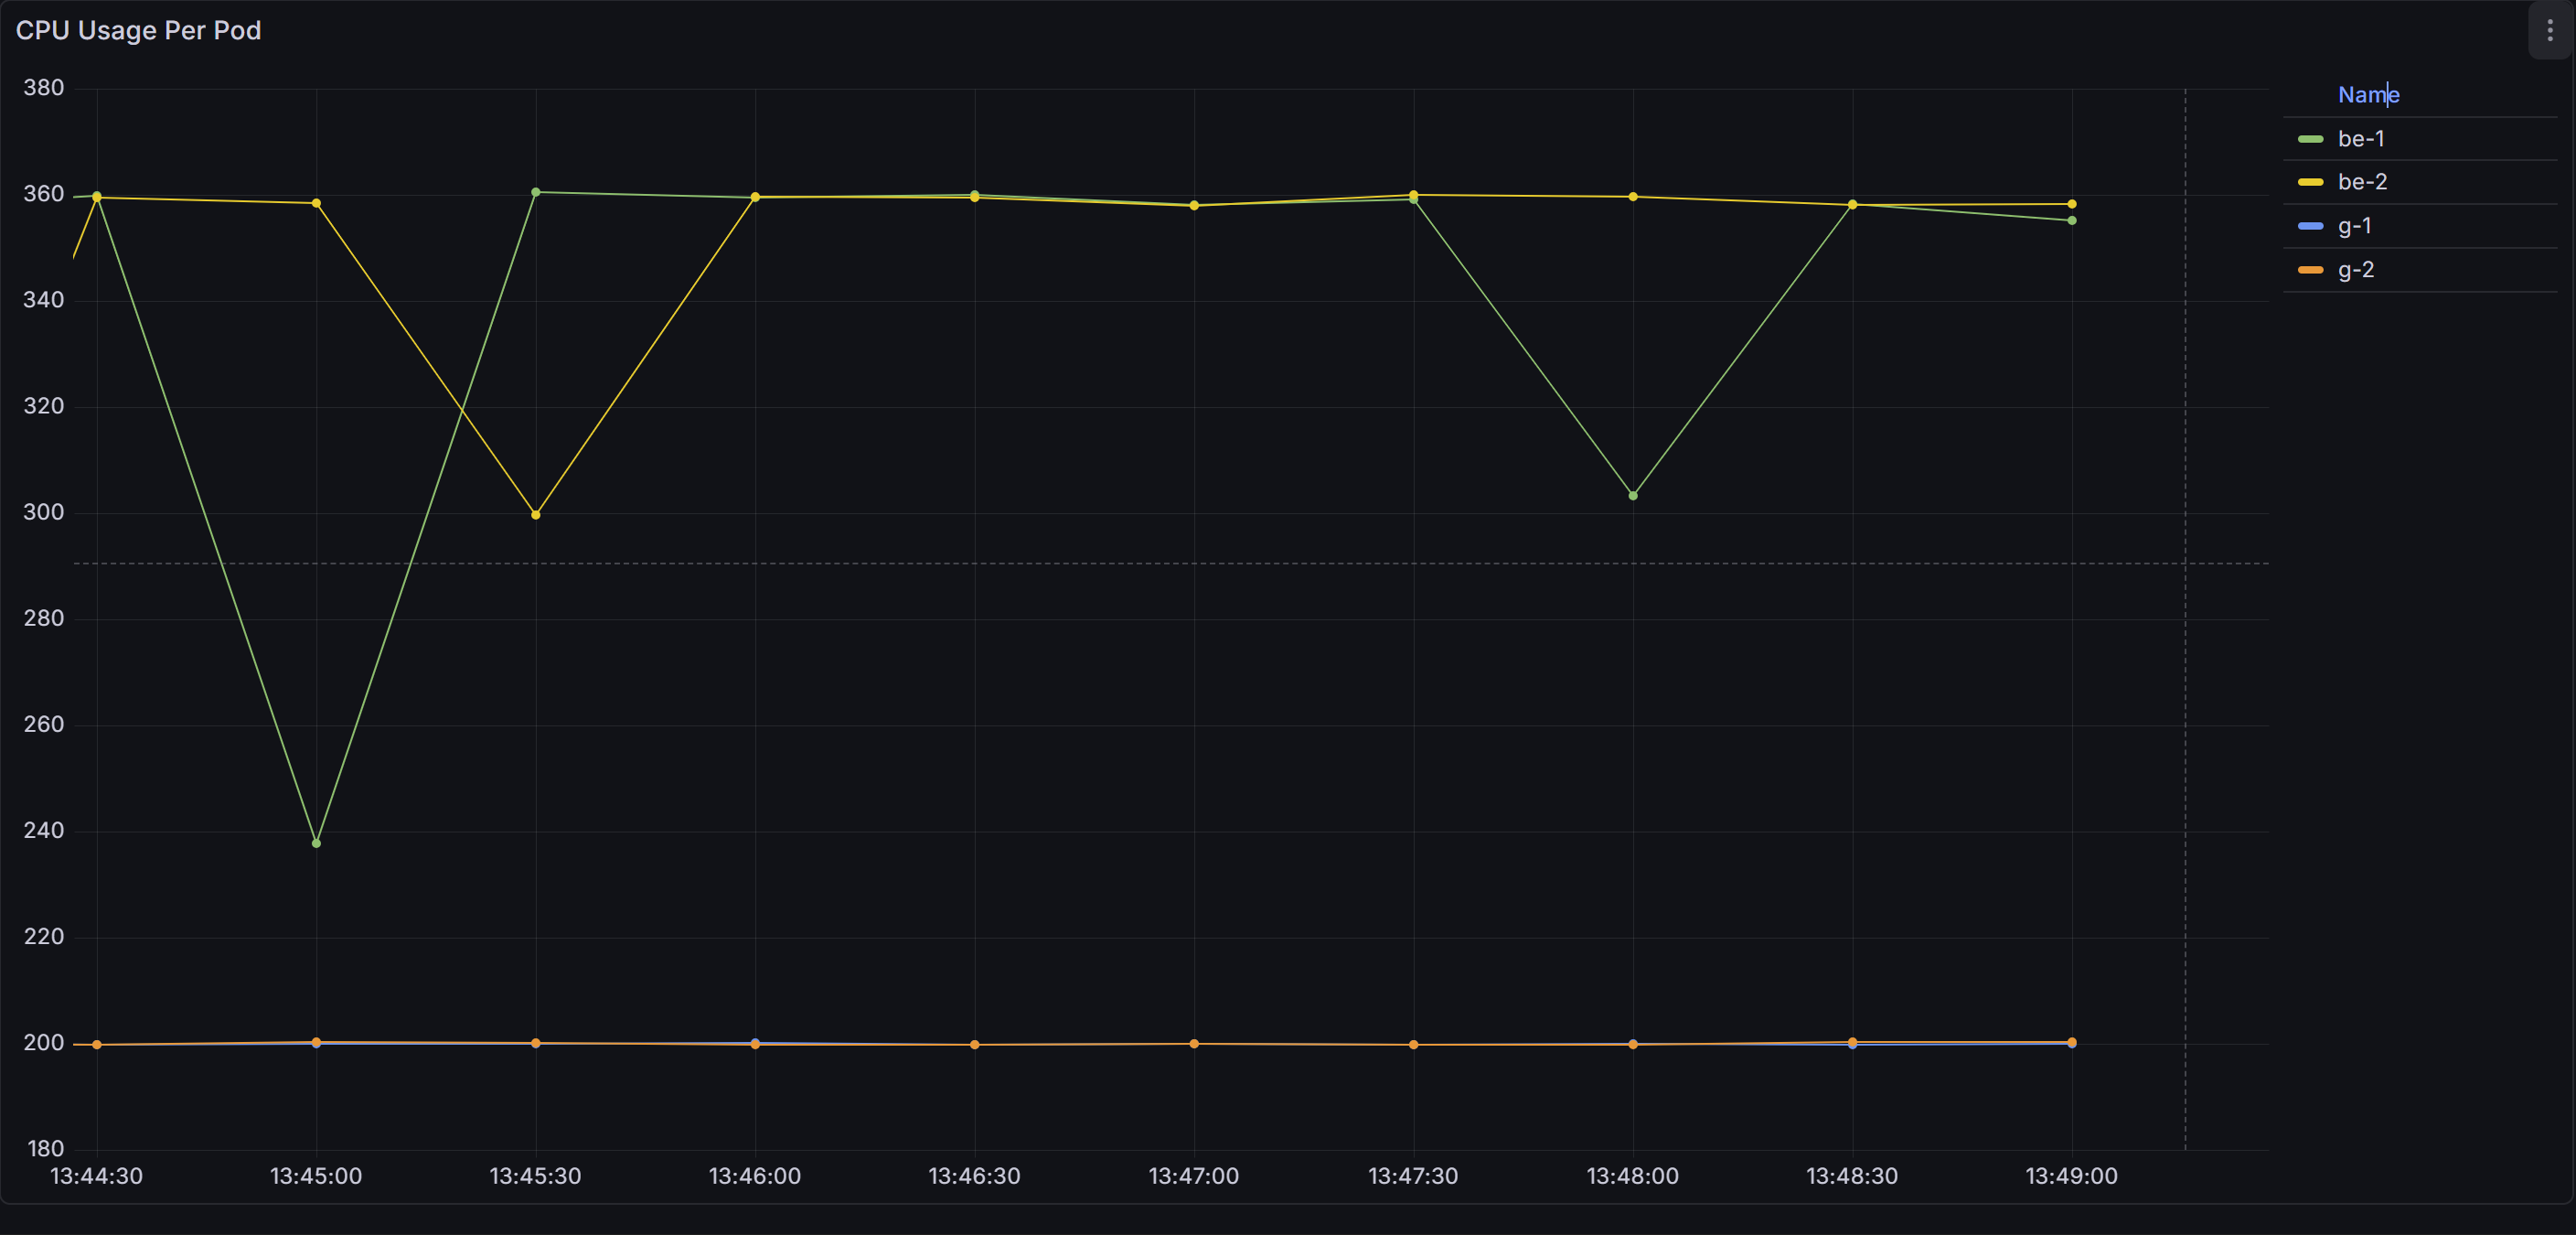
The CPU usage graph shifted. Before this, both BestEffort pods were sitting around 450–460m each. After adding g-1 and g-2, the changes are clear:
Why?
This happens because the Guaranteed pods requested 200m, while BestEffort pods requested nothing. So the scheduler gave the Guaranteed pods their proportional share first, and the remaining CPU was distributed to the BestEffort pods.
Now comes the critical observation.
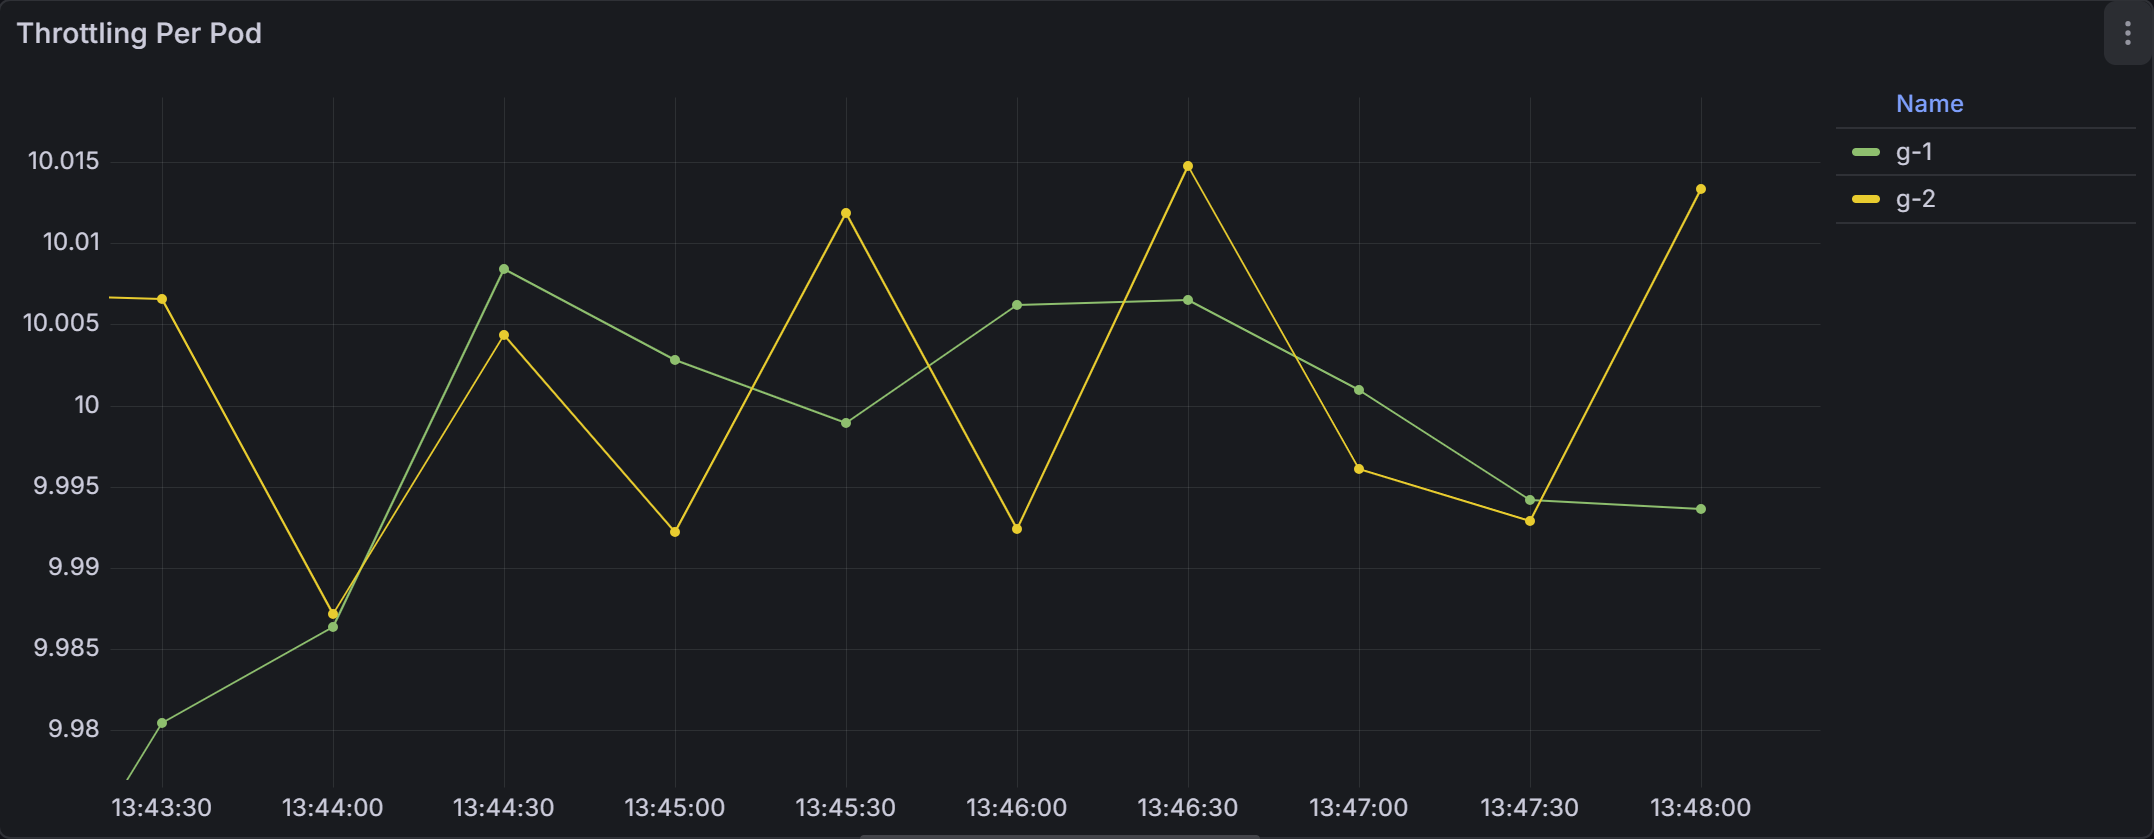
As you can see both Guaranteed pods showed consistent throttling; g-1 and g-2 had ~ 10 throttled periods per second and the BestEffort pods showed nothing.
Why?
This happens because Guaranteed pods define a CPU limit, and CPU limits are enforced by CPU throttling as we discussed before.

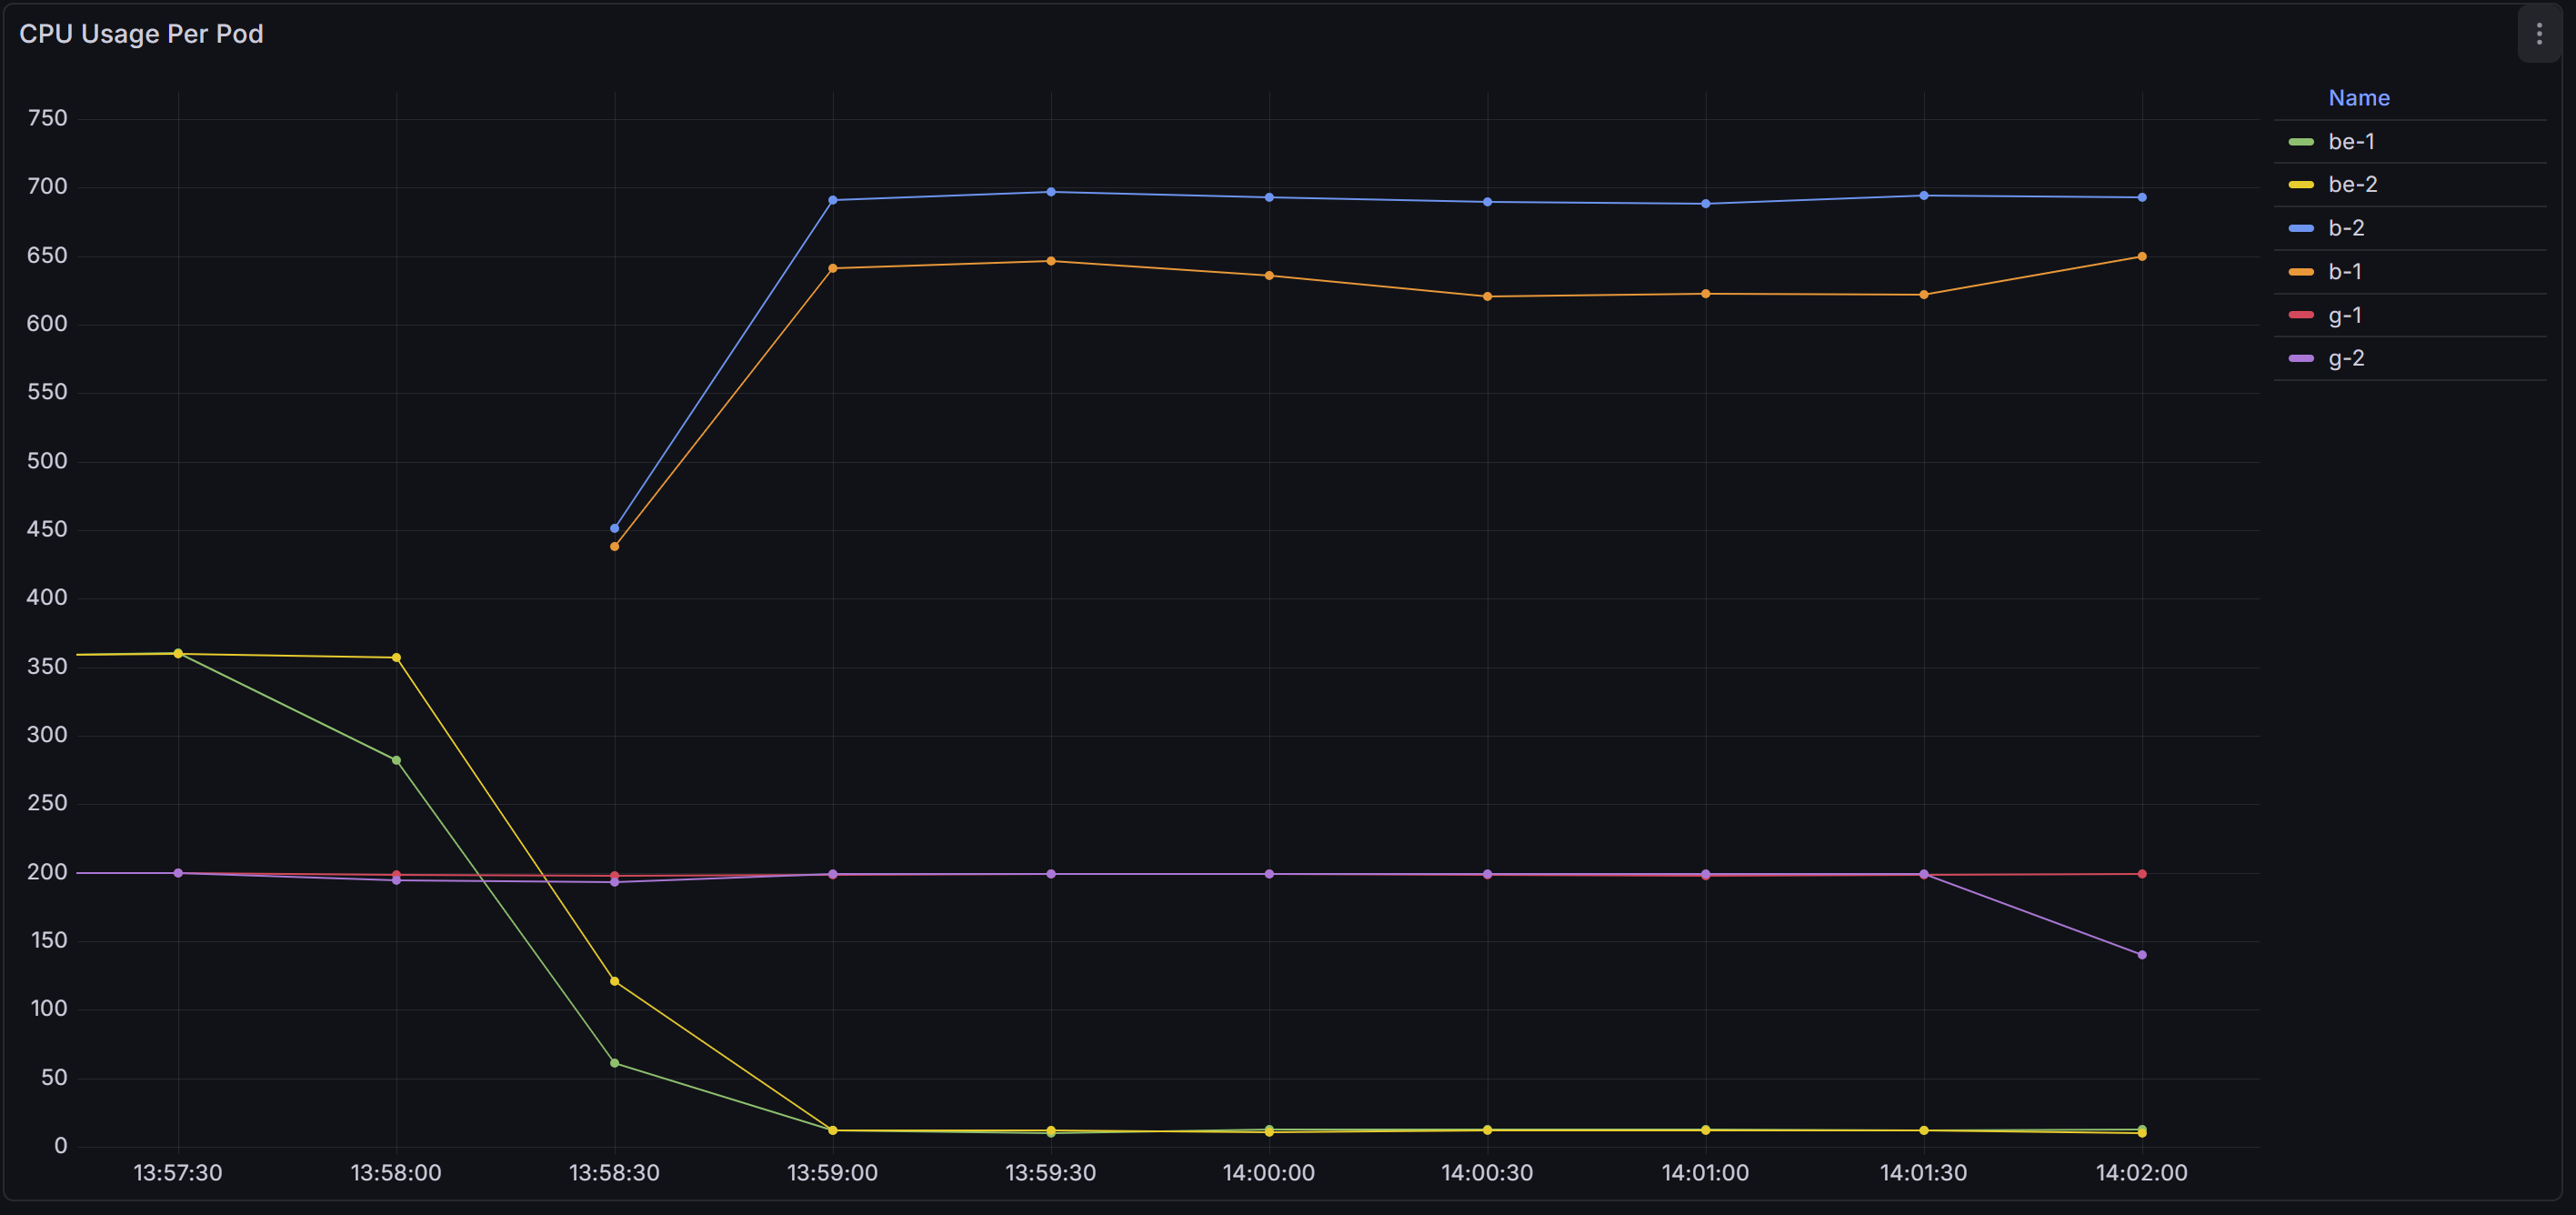
Now look at the node CPU usage graph. The node running these workloads was hovering around 35–42% CPU usage.
Not 90%. Not 100%. Around 40%.
And yet, the Guaranteed pods were being throttled.
The node still had idle CPU available, but the Guaranteed pods could not use it because their CPU limit enforced a strict quota through cpu.max.
This is where CPU limits start to backfire.
In the final step of the experiment, we added two burstable pods - request = 300m, no CPU limit.
As soon as the Burstable pods started running under load.
The CPU usage graph shifted dramatically.
As you can see the Burstable pods were now dominating the CPU.
Why?
This happens because Burstable pods requested 300m - higher than the 200m requested by the Guaranteed pods. Under contention, higher weight means a larger proportional share of CPU.
That is why Burstable pods moved to the top, Guaranteed pods stayed in the middle, and BestEffort pods were pushed to the bottom.
Note for throttling: The Burstable pods are consuming far more CPU than their request, yet they are not throttled - because they have no limits.cpu configured.
The following are the best practices to do in production:
If you skip CPU requests, your pod becomes BestEffort and gets the lowest CPU priority. Setting requests makes your app more stable and avoids surprise slowdowns because CPU requests translate into cpu.weight, which decide how much CPU your pod gets when multiple pods want CPU at the same time.
CPU limits often slow applications because CFS throttles the container’s cgroup when it hits the limit, even when the node has plenty of free CPU. Most production workloads run better with CPU requests only, without limits.
Equal memory request and limit make your pod predictable and stable. It lowers the risk of OOM kills caused by scheduler misplacement. This also simplifies debugging and capacity planning. (we can also mention why see above section )
Monitoring helps you detect performance issues before users notice them. It keeps resource settings aligned with real workload needs. A small amount of observation saves hours of debugging later.
Policies like LimitRange or ResourceQuota are useful only in shared environments. They prevent teams or workloads from consuming too many resources. If your cluster is used by a single team, you may not need these guardrails.
There are a few situations where CPU limits genuinely make sense:
CPU limits help protect teams from each other when many workloads share the same cluster. Limits prevent one team’s pod from consuming all CPU and starving others.
Limits create a stable, predictable CPU cap during tests. This helps you repeat the same test with the same conditions every time. Without limits, results change based on how busy the node is, making tests inconsistent.
Some companies track CPU usage per team or per customer. In these cases, limits enforce hard boundaries so workloads never exceed their assigned budget. This makes cost planning predictable, although it does not guarantee consistent performance.
If your product sells fixed CPU tiers (like 1 vCPU plan, 2 vCPU plan), you need CPU limits. This ensures customers only use the CPU they paid for, and higher tiers get what they expect. Limits guarantee consistent performance per plan.
Some managed Kubernetes platforms enforce CPU limits automatically. They do this to guarantee predictable resource isolation and cost behavior, not for performance reasons.
Tim Hockin (Kubernetes co-creator) summed it up perfectly in this famous X reply:

In the end, I would say CPU limits can quietly become a performance bottleneck if we don’t understand how they work under the hood.
What looks like a safe configuration can sometimes introduce hidden throttling and unexpected latency. When we understand the mechanics behind it, we stop guessing and start making deliberate, performance-aware decisions for our clusters.